pytest
pytest
pytest是Python的单元测试框架,同自带的unittest框架类似,但pytest框架使用起来更简洁,效率更高。
pytest特点
- 入门简单易上手,文档支持较好。
- 支持单元测试和功能测试。
- 支持参数化。
- 可以跳过指定用例,或对某些预期失败的case标记成失败。
- 支持重复执行失败的case。
- 支持运行由unittest编写的测试用例。
- 有很多第三方插件,并且可自定义扩展。
- 方便和支持集成工具进行集成。
安装
pip install pytest简单使用
import pytest

def test_case01():
    print('执行用例01.......')
    assert 0  # 断言失败

def test_case02():
    print('执行用例02.......')
    assert 1  # 断言成功

def custom_case03():
    print('执行用例03.......')
    assert 1  # 断言成功

if __name__ == '__main__':
    pytest.main(["-s", "main.py"])
执行结果:
(mytest) adcwb@adcwb:/data/projects/mytest$ python main.py
================================ test session starts ==============================
platform linux -- Python 3.8.10, pytest-6.2.5, py-1.11.0, pluggy-1.0.0
rootdir: /data/projects/mytest
collected 2 items

main.py 执行用例01.......
F执行用例02.......
.

================================== FAILURES ====================================
_________________________________________ test_case01 _______________________________

    def test_case01():
        print('执行用例01.......')
>       assert 0  # 断言失败
E       assert 0

main.py:6: AssertionError
========================== short test summary info ==============================
FAILED main.py::test_case01 - assert 0
========================== 1 failed, 1 passed in 0.03s ==========================
(mytest) adcwb@adcwb:/data/projects/mytest$ 上例中,当我们在执行(就像Python解释器执行普通的Python脚本一样)测试用例的时候,pytest.main(["-s", "main.py"])中的传参需要是一个列表,传的参数是str的形式,其他形式的会报错
大致的信息就是告诉我们:
collected 2 items:本次执行中,收集了2个用例。- 完了开始执行用例,
.表示执行成功,F表示执行失败。 - 脚本中的第一个用例执行失败;第二个用例执行成功;但是第三个也就是
custom_case03并没有执行,由此我们知道,pytest只识别以test_开头的用例。
pytest.main(["-s", “main.py”])参数说明
-s,在控制台中输出print的结果,有些情况下,ptest不会展示print的输出,所以使用-s参数来实现。main.py是要执行的脚本名称。
+++
踩坑:你创建的pytest脚本名称中不允许含有.,
比如1.简单上手.py,这样会报错。当然,可以这么写1-简单上手.py
除了上述的函数写法以外,还可以有用例类的写法:
import pytest

class TestCase(object):

    def test_case01(self):
        """ 用例 01 """
        print('执行用例01.......')
        assert 0  # 断言失败

    def test_case02(slef):
        """ 用例 02 """
        print('执行用例02.......')
        assert 1  # 断言成功

if __name__ == '__main__':
pytest.main(["-s", "main.py"])用法跟unittest差不多,类名要以Test开头,并且其中的用例方法也要以test开头,然后执行也一样。
setup和teardown
我们知道,在unittest中,setup和teardown可以在每个用例前后执行,也可以在所有的用例集执行前后执行。那么在pytest中,有以下几种情况:
- 模块级别,也就是在整个测试脚本文件中的用例集开始前后,对应的是:
- setup_module
- teardown_module
- 类级别,在类中的所有用例集执行前后,对应的是:
- setup_class
- teardown_class
- 在类中呢,也可以在进一步划分,在每一个方法执行前后,对应:
- setup_method
- teardown_method
- 函数级别,在用例函数之前后,对应:
- setup_function
- teardown_function
来一一看看各自的用法。
模块级别setup_module/teardown_module
import pytest


def setup_module():
    """ 模块级别的 setup,在该脚本内所有用例集执行之前触发执行 """
    print('模块级别的 setup.....')

def test_case01():
    print('执行用例01.......')
    assert 0  # 断言失败

def test_case02():
    print('执行用例02.......')
    assert 1  # 断言成功

def teardown_module():
    """ 模块级别的 teardown,在该脚本内所有用例集执行之后触发执行 """
    print('模块级别的 teardown.....')

if __name__ == '__main__':
    pytest.main(["-s", "main.py"])
类级别的setup_class/teardown_class
import pytest

class TestCase(object):

    def setup_class(self):
        """ 类级别的 setup,在该类中内用例集执行之前触发执行 """
        print('类级别的 setup.....')

    def teardown_class(self):
        """ 类级别的 teardown,在该类中内用例集执行之后触发执行 """
        print('类级别的 teardown.....')

    def test_case01(self):
        """ 用例 01 """
        print('执行用例01.......')
        assert 0  # 断言失败

    def test_case02(slef):
        """ 用例 02 """
        print('执行用例02.......')
        assert 1  # 断言成功

if __name__ == '__main__':
    pytest.main(["-s", "main.py"])
类中方法级别的setup_method/teardown_method
import pytest

class TestCase(object):

    def setup_method(self):
        """ 类中方法级别的 setup,在该类中内每个用例执行之前触发执行 """
        print('类中方法级别的 setup.....')

    def teardown_method(self):
        """ 类中方法级别的 teardown,在该类中内每个用例执行之后触发执行 """
        print('类中方法级别的 teardown.....')

    def test_case01(self):
        """ 用例 01 """
        print('执行用例01.......')
        assert 0  # 断言失败

    def test_case02(slef):
        """ 用例 02 """
        print('执行用例02.......')
        assert 1  # 断言成功

if __name__ == '__main__':
    pytest.main(["-s", "main.py"])
函数级别的setup_function/teardown_function
import pytest

def setup_function():
    """ 函数级别的 setup,在该脚本内每个用例函数执行之前触发执行 """
    print('函数级别的 setup.....')

def test_case01():
    print('执行用例01.......')
    assert 0  # 断言失败

def test_case02():
    print('执行用例02.......')
    assert 1  # 断言成功

def teardown_function():
    """ 函数级别的 teardown,在该脚本内每个用例函数执行之后触发执行 """
    print('函数级别的 teardown.....')


if __name__ == '__main__':
    pytest.main(["-s", "main.py"])
小结
- 在类中,不需要
__init__方法。 - 测试类的类名必须以
Test开头。 - 类中的测试方法编写规则跟函数一致。
配置文件
该脚本有多种运行方式,如果处于PyCharm环境,可以使用右键或者点击运行按钮运行,也就是在pytest中的主函数中运行:
if __name__ == '__main__':
    pytest.main(["-s", "main.py"])   # 就是调用的 pytest 的 main 函数
也可以在命令行中运行:
$ python main.py这种方式,跟使用Python解释器执行Python脚本没有什么两样。也可以如下面这么执行:
$ pytest -s main.py当然,还有一种是使用配置文件运行,来看看怎么用。
在项目的根目录下,我们可以建立一个pytest.ini文件,在这个文件中,我们可以实现相关的配置:
[pytest]
addopts = -s -v
testpaths = ./scripts
python_files = test_*.py
python_classes = Test*
python_functions = test_*
注意,配置文件中不许有中文
那这个配置文件中的各项都是什么意思呢?
首先,pytest.ini文件必须位于项目的根目录,而且也必须叫做pytest.ini。
其他的参数:
addopts可以搭配相关的参数,比如-s。多个参数以空格分割,其他参数后续用到再说。-s,在运行测试脚本时,为了调试或打印一些内容,我们会在代码中加一些print内容,但是在运行pytest时,这些内容不会显示出来。如果带上-s,就可以显示了。-v,使输出结果更加详细。
testpaths配置测试用例的目录,- 因为我们用例可能分布在不同的目录或文件中,那么这个
scripts就是我们所有文件或者目录的顶层目录。其内的子文件或者子目录都要以test_开头,pytest才能识别到。 - 另外,上面这么写,是从一个总目录下寻找所有的符合条件的文件或者脚本,那么我们想要在这个总目录下执行其中某个具体的脚本文件怎么办?
[pytest]
testpaths = ./scripts/
python_files = test_case_01.py
这么写就是执行
scripts目录下面的test_case_01.py这个文件。- 因为我们用例可能分布在不同的目录或文件中,那么这个
python_classes则是说明脚本内的所有用例类名必须是以Test开头,当然,你也可以自定义为以Test_开头,而类中的用例方法则当然是以test_开头。python_functions则是说脚本内的所有用例函数以test_开头才能识别。
# scripts/test_case_01.py
import pytest

def test_case01():
    print('执行用例01.......')
    assert 1  # 断言成功

def test_case02():
    print('执行用例02.......')
    assert 1  # 断言成功

class TestCaseClass(object):

    def test_case_03(self):
        assert 0  # 断言失败

# scripts/test_case_dir1/test_case02.py
import pytest

def test_case_04():
    assert 1  # 断言成功

def test_case_05():
    assert 0  # 断言失败

# pytest.ini
[pytest]
addopts = -s -v
testpaths = ./scripts
python_files = test_*.py
python_classes = Test*
python_functions = test_*
在上面的案例中,直接在shell终端下执行pytest即可,共有5个用例将被执行,而结果则是两个失败三个成功
跳过用例
我们知道在unittest中,跳过用例可以用skip,那么这同样是适用于pytest。
来看怎么使用:
# test_allure_case.py

import pytest

@pytest.mark.skip(condition='我就是要跳过这个用例啦')
def test_case_01():
    assert 1

@pytest.mark.skipif(condition=1 < 2, reason='如果条件为true就跳过用例')
def test_case_02():
assert 1跳过用例,我们使用@pytest.mark.skipif(condition, reason):
- condition表示跳过用例的条件。
- reason表示跳过用例的原因。
然后将它装饰在需要被跳过用例的的函数上面。
效果如下:
M:\py_tests>pytest
scripts/test_allure_case.py::test_case_01 SKIPPED
scripts/test_allure_case.py::test_case_02 SKIPPED

=========================== 2 skipped in 0.14s ================================上例执行结果相对详细,因为我们在配置文件中为addopts增加了-v,之前的示例结果中,没有加!
另外,此时,在输出的控制台中, 还无法打印出reason信息,如果需要打印,则可以在配置文件中的addopts参数的-s变为-rs:
[pytest]
addopts = -rs -v
testpaths = ./scripts
python_files = test_*.py
python_classes = Test*
python_functions = test_*
预期失败标记
如果我们事先知道测试函数会执行失败,但又不想直接跳过,而是希望显示的提示。
Pytest 使用 pytest.mark.xfail实现预见错误功能::
xfail(condiition, reason, [raises=None, run=True, strict=False])需要掌握的必传参数的是:
- condition,预期失败的条件,当条件为真的时候,预期失败。
- reason,失败的原因。
那么关于预期失败的几种情况需要了解一下:
- 预期失败,但实际结果却执行成功。
- 预期失败,实际结果也执行执行失败。 来看示例:
import pytest


class TestCase(object):

    @pytest.mark.xfail(1 < 2, reason='预期失败, 执行失败')
    def test_case_01(self):
        """ 预期失败, 执行也是失败的 """
        print('预期失败, 执行失败')
        assert 0

    @pytest.mark.xfail(1 < 2, reason='预期失败, 执行成功')
    def test_case_02(self):
        """ 预期失败, 但实际执行结果却成功了 """
        print('预期失败, 执行成功')
        assert 1
pytest 使用 x 表示预见的失败(XFAIL)。
如果预见的是失败,但实际运行测试却成功通过,pytest 使用 X 进行标记(XPASS)。
而在预期失败的两种情况中,我们不希望出现预期失败,结果却执行成功了的情况出现,因为跟我们想的不一样嘛,我预期这条用例失败,那这条用例就应该执行失败才对,你虽然执行成功了,但跟我想的不一样,你照样是失败的!
所以,我们需要将预期失败,结果却执行成功了的用例标记为执行失败,可以在pytest.ini文件中,加入:
[pytest]
xfail_strict=true
这样就就把上述的情况标记为执行失败了。
参数化
pytest身为强大的单元测试框架,那么同样支持DDT数据驱动测试的概念。也就是当对一个测试函数进行测试时,通常会给函数传递多组参数。比如测试账号登陆,我们需要模拟各种千奇百怪的账号密码。
当然,我们可以把这些参数写在测试函数内部进行遍历。不过虽然参数众多,但仍然是一个测试,当某组参数导致断言失败,测试也就终止了。
通过异常捕获,我们可以保证程所有参数完整执行,但要分析测试结果就需要做不少额外的工作。
在 pytest 中,我们有更好的解决方法,就是参数化测试,即每组参数都独立执行一次测试。使用的工具就是 pytest.mark.parametrize(argnames, argvalues)。
- argnames表示参数名。
- argvalues表示列表形式的参数值。
使用就是以装饰器的形式使用。
只有一个参数的测试用例
import pytest

mobile_list = ['10010', '10086']

@pytest.mark.parametrize('mobile', mobile_list)
def test_register(mobile):
    """ 通过手机号注册 """
    print('注册手机号是: {}'.format(mobile))
来看(重要部分)结果::
M:\py_tests>pytest
scripts/test_case_01.py::test_register[10010] 注册手机号是: 10010
PASSED
scripts/test_case_01.py::test_register[10086] 注册手机号是: 10086
PASSED

====================================================== 2 passed in 0.11s ======================================================
可以看到,列表内的每个手机号,都是一条测试用例。
多个参数的测试用例
import pytest

mobile_list = ['10010', '10086']
code_list = ['x2zx', 'we2a']

@pytest.mark.parametrize('mobile', mobile_list)
@pytest.mark.parametrize('code', code_list)
def test_register(mobile, code):
    """ 通过手机号注册 """
    print('注册手机号是: {} 验证码是: {}'.format(mobile, code))
(重要部分)结果:
M:\py_tests>pytest

scripts/test_case_01.py::test_register[x2zx-10010] 注册手机号是: 10010 验证码是: x2zx
PASSED
scripts/test_case_01.py::test_register[x2zx-10086] 注册手机号是: 10086 验证码是: x2zx
PASSED
scripts/test_case_01.py::test_register[we2a-10010] 注册手机号是: 10010 验证码是: we2a
PASSED
scripts/test_case_01.py::test_register[we2a-10086] 注册手机号是: 10086 验证码是: we2a
PASSED

====================================================== 4 passed in 0.17s =======================================================
可以看到,每一个手机号与每一个验证码都组合一起执行了,这样就执行了4次。那么如果有很多个组合的话,用例数将会更多。我们希望手机号与验证码一一对应组合,也就是只执行两次,怎么搞呢?
import pytest

mobile_list = ['10010', '10086']
code_list = ['x2zx', 'we2a']

@pytest.mark.parametrize('mobile,code', zip(mobile_list, code_list))
def test_register(mobile, code):
    """ 通过手机号注册 """
print('注册手机号是: {} 验证码是: {}'.format(mobile, code))在多参数情况下,多个参数名是以,分割的字符串。参数值是列表嵌套的形式组成的。
M:\py_tests>pytest

scripts/test_case_01.py::test_register[10010-x2zx] 注册手机号是: 10010 验证码是: x2zx
PASSED
scripts/test_case_01.py::test_register[10086-we2a] 注册手机号是: 10086 验证码是: we2a
PASSED

====================================================== 2 passed in 0.44s ======================================================
固件
固件(Fixture)是一些函数,pytest 会在执行测试函数之前(或之后)加载运行它们,也称测试夹具。
我们可以利用固件做任何事情,其中最常见的可能就是数据库的初始连接和最后关闭操作。
Pytest 使用 pytest.fixture() 定义固件,下面是最简单的固件,访问主页前必须先登录:
import pytest

@pytest.fixture()
def login():
    print('登录....')

def test_index(login):
    print('主页....')
结果:
M:\py_tests>pytest

scripts/test_case_01.py::test_index 登录....
主页....
PASSED

====================================================== 1 passed in 0.13s =======================================================
作用域
在之前的示例中,你可能会觉得,这跟之前的setup和teardown的功能也类似呀,但是,fixture相对于setup和teardown来说更灵活。pytest通过scope参数来控制固件的使用范围,也就是作用域。
在定义固件时,通过 scope 参数声明作用域,可选项有:
function: 函数级,每个测试函数都会执行一次固件;class: 类级别,每个测试类执行一次,所有方法都可以使用;module: 模块级,每个模块执行一次,模块内函数和方法都可使用;session: 会话级,一次测试只执行一次,所有被找到的函数和方法都可用。
默认的作用域为
function。
比如之前的login固件,可以指定它的作用域:
import pytest

@pytest.fixture(scope='function')
def login():
    print('登录....')

def test_index(login):
    print('主页....')
预处理和后处理
很多时候需要在测试前进行预处理(如新建数据库连接),并在测试完成进行清理(关闭数据库连接)。
当有大量重复的这类操作,最佳实践是使用固件来自动化所有预处理和后处理。
Pytest 使用 yield 关键词将固件分为两部分,yield 之前的代码属于预处理,会在测试前执行;yield 之后的代码属于后处理,将在测试完成后执行。
以下测试模拟数据库查询,使用固件来模拟数据库的连接关闭:
import pytest

@pytest.fixture()
def db():
    print('Connection successful')

    yield

    print('Connection closed')

def search_user(user_id):
    d = {
        '001': 'xiaoming',
        '002': 'xiaohua'
    }
    return d[user_id]

def test_case_01(db):
    assert search_user('001') == 'xiaoming'

def test_case_02(db):
    assert search_user('002') == 'xiaohua'
结果:
M:\py_tests>pytest

scripts/test_case_01.py::test_case_01 Connection successful
PASSEDConnection closed

scripts/test_case_01.py::test_case_02 Connection successful
PASSEDConnection closed

====================================================== 2 passed in 0.15s =======================================================
可以看到在两个测试用例执行前后都有预处理和后处理。
常用插件
pytest中还有非常多的插件供我们使用,我们来介绍几个常用的。
先来看一个重要的,那就是生成测试用例报告。
pytest测试报告插件
下载:
安装:
	pip install pytest-html

官网:
	https://github.com/pytest-dev/pytest-html

使用:
	在配置文件中,添加以下参数:

[pytest]
addopts = -s --html=report/report.html
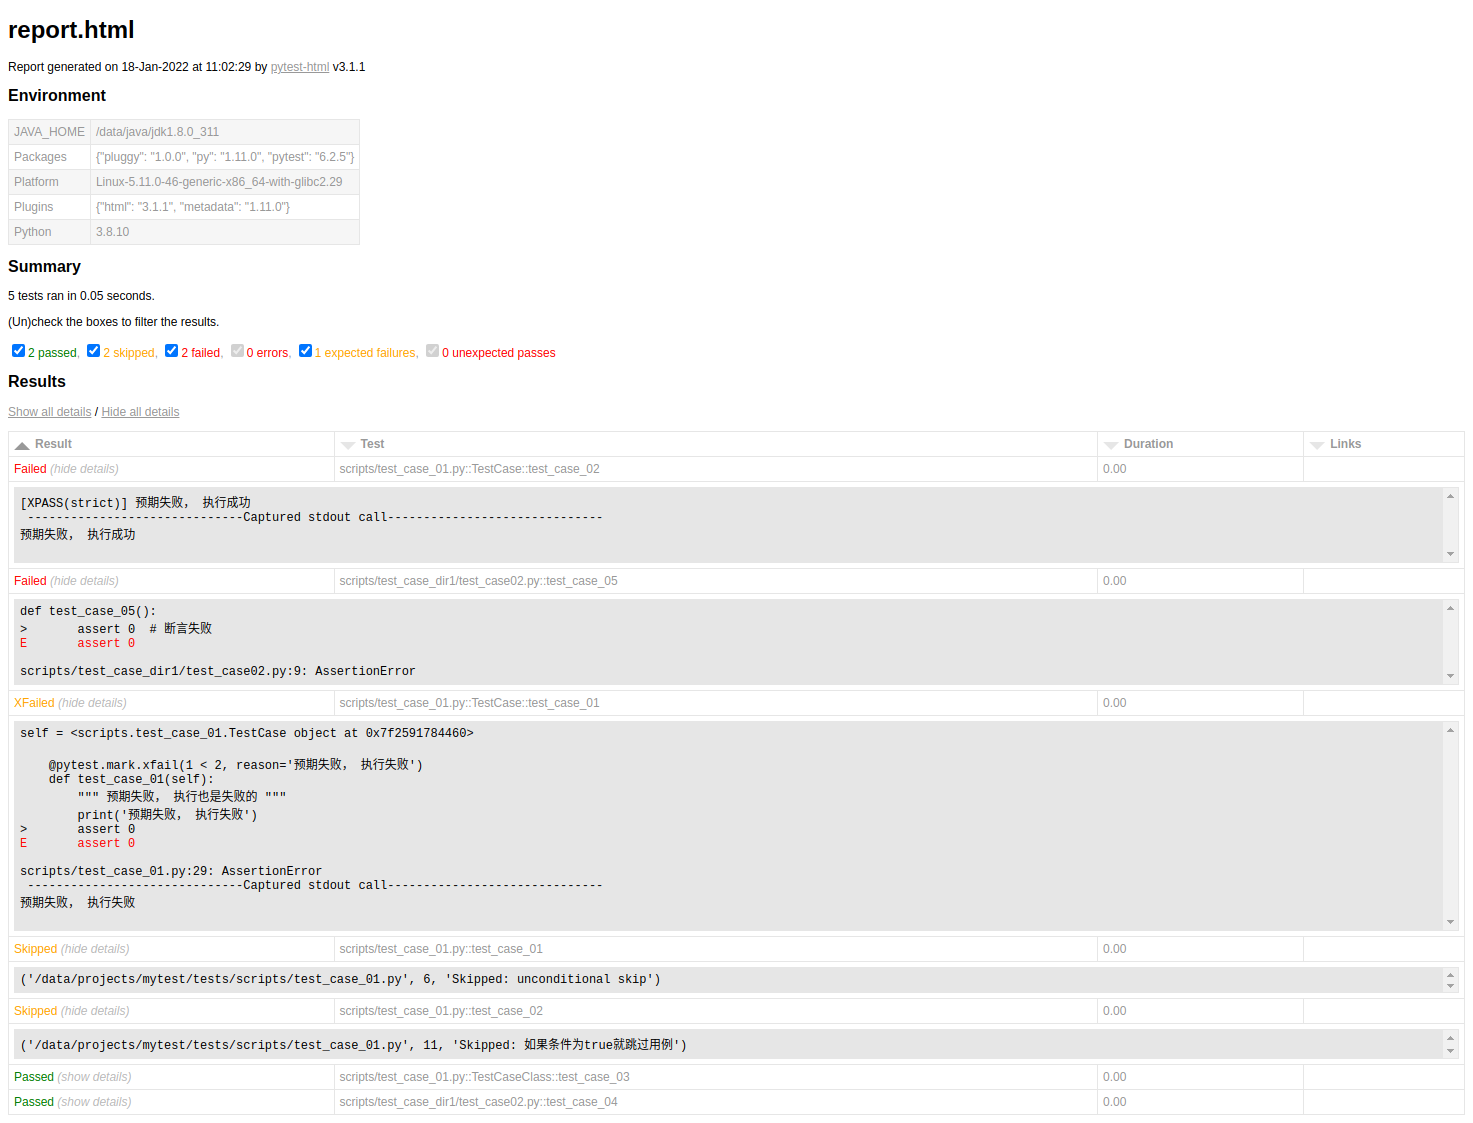
完事之后,让我们继续终端中使用pytest重新跑测试用例,用例结果就不展示了,跟上面的结果一样,我们关注项目目录下的report/report.html文件,我们用浏览器打开它,你会发现:
allure
Allure框架是一个灵活的轻量级多语言测试报告工具,它不仅以web的方式展示了简洁的测试结果,而且允许参与开发过程的每个人从日常执行的测试中最大限度的提取有用信息。 从开发人员(dev,developer)和质量保证人员(QA,Quality Assurance)的角度来看,Allure报告简化了常见缺陷的统计:失败的测试可以分为bug和被中断的测试,还可以配置日志、步骤、fixture、附件、计时、执行历史以及与TMS和BUG管理系统集成,所以,通过以上配置,所有负责的开发人员和测试人员可以尽可能的掌握测试信息。 从管理者的角度来看,Allure提供了一个清晰的“大图”,其中包括已覆盖的特性、缺陷聚集的位置、执行时间轴的外观以及许多其他方便的事情。allure的模块化和可扩展性保证了我们总是能够对某些东西进行微调。
Python的pytest中allure下载
pip install allure-pytest但由于这个allure-pytest插件生成的测试报告不是html类型的,我们还需要使用allure工具再“加工”一下。所以说,我们还需要下载这个allure工具。
allure工具下载
在现在allure工具之前,它依赖Java环境,我们还需要先配置Java环境。
各平台配置Java环境参考:https://www.cnblogs.com/Neeo/articles/11954283.html
注意,如果你的电脑已经有了Java环境,就无需重新配置了。
配置完了Java环境,我们再来下载allure工具,我这里直接给出了百度云盘链接,你也可以去其他链接中自行下载:
https://github.com/allure-framework/allure2
优先选择:https://bintray.com/qameta/maven/allure2
百度云盘链接:https://pan.baidu.com/s/1Xj1A_xsRscOZHskTR4xjAg 提取码:6b33
下载并解压好了allure工具包之后,还需要将allure包内的bin目录添加到系统的环境变量中。
完事后打开你的终端测试:
C:\Users\Anthony\Desktop>allure --version
2.10.0
返回了版本号说明安装成功。
使用
一般使用allure要经历几个步骤:
- 配置
pytest.ini文件。 - 编写用例并执行。
- 使用allure工具生成html报告。
来看配置pytest.ini:
[pytest]
addopts =  -v -s --html=report/report.html --alluredir ./report/result
testpaths = ./scripts/
python_files = test_allure_case.py
python_classes = Test*
python_functions = test_*
# xfail_strict=true就是--alluredir ./report/result参数。
在终端中输入pytest正常执行测试用例即可:
import pytest

def test_case_01():
    assert 1

def test_case_02():
    assert 0

def test_case_03():
assert 1执行完毕后,在项目的根目下,会自动生成一个report目录,这个目录下有:
- report.html是我们的之前的
pytest-html插件生成的HTML报告,跟allure无关。 - result和assets目录是allure插件生成的测试报告文件,但此时该目录内还没有什么HTML报告,只有一些相关数据。
接下来需要使用allure工具来生成HTML报告。
此时我们在终端(如果是windows平台,就是cmd),路径是项目的根目录,执行下面的命令。
PS:我在pycharm中的terminal输入allure提示’allure’ 不是内部或外部命令,也不是可运行的程序或批处理文件。但windows的终端没有问题。
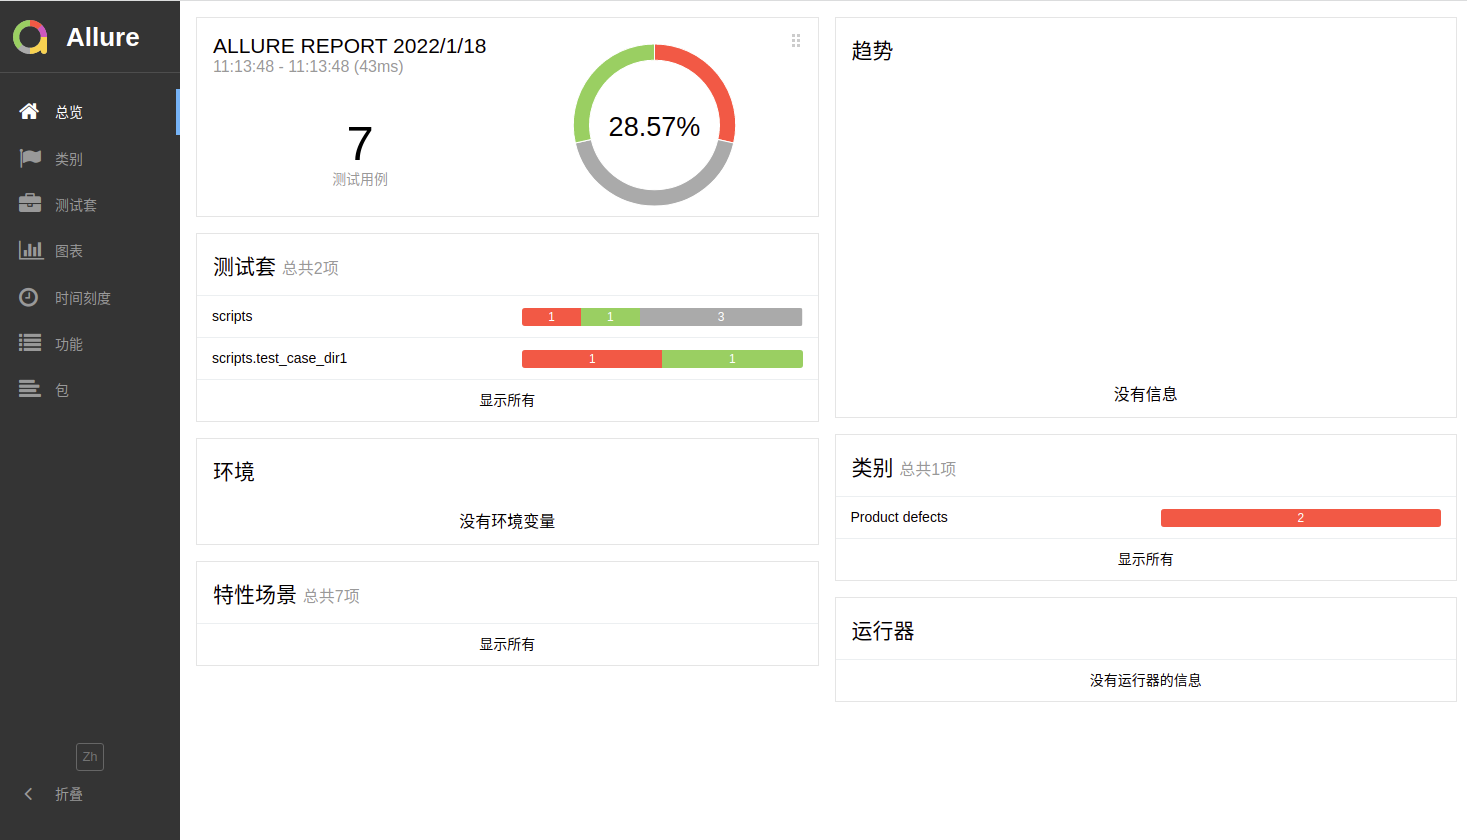
$ allure generate report/result -o report/allure_html --clean
Report successfully generated to report\allure_html命令的意思是,根据report\result目录中的数据(这些数据是运行pytest后产生的)。在report目录下新建一个allure_html目录,而这个目录内有index.html才是最终的allure版本的HTML报告;如果你是重复执行的话,使用--clean清除之前的报告。
allure open 默认的,allure报告需要HTTP服务器来打开,一般我们可以通过pycharm来完成,另外一种情况就是通过allure自带的open命令来完成
$ allure open report/allure_html
Starting web server...
2022-01-18 12:27:45.194:INFO::main: Logging initialized @545ms to org.eclipse.jetty.util.log.StdErrLog
Server started at <http://172.16.1.147:41885/>. Press <Ctrl+C> to exit
正在现有的浏览器会话中打开。
allure的其他用法 当然,故事还是没有完!在使用allure生成报告的时候,在编写用例阶段,还可以有一些参数可以使用:
title,自定义用例标题,标题默认是用例名。
description,测试用例的详细说明。
feature和story被称为行为驱动标记,因为使用这个两个标记,通过报告可以更加清楚的掌握每个测试用例的功能和每个测试用例的测试场景。或者你可以理解为feature是模块,而story是该模块下的子模块。
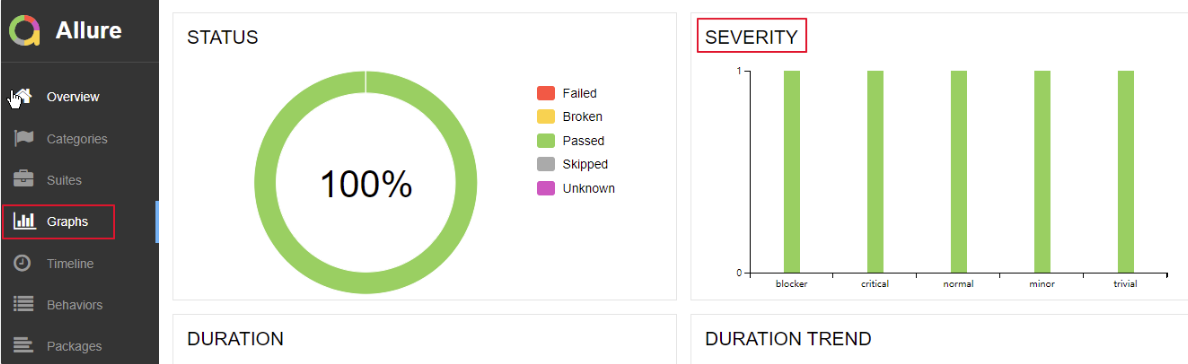
allure中对bug的严重(severity)级别也有定义,allure使用
severity来标识测试用例或者测试类的bug级别,分为blocker,critical,normal,minor,trivial5个级别。一般,bug分为如下几个级别:
- Blocker级别:中断缺陷(客户端程序无响应,无法执行下一步操作),系统无法执行、崩溃或严重资源不足、应用模块无法启动或异常退出、无法测试、造成系统不稳定。
- Critical级别:即影响系统功能或操作,主要功能存在严重缺陷,但不会影响到系统稳定性。比如说一个服务直接不可用了,微信不能发消息,支付宝不能付款这种,打开直接报错。
- Major:即界面、性能缺陷、兼容性。如操作界面错误(包括数据窗口内列名定义、含义是否一致)、长时间操作无进度提示等。
- Normal级别:普通缺陷(数值计算错误),是指非核心业务流程产生的问题,比如说知乎无法变更头像,昵称等。这个要看自己的定义。
- Minor/Trivial级别:轻微缺陷(必输项无提示,或者提示不规范),比如各种影响体验,但不影响使用的内容。
dynamic,动态设置相关参数。
allure.title与allure.description
import pytest
import allure

@allure.title('测试用例标题1')
@allure.description('这是测试用例用例1的描述信息')
def test_case_01():
    assert 1

def test_case_02():
    assert 0

def test_case_03():
    assert 1
feature和story
import pytest
import allure

@allure.feature('登录模块')
class TestCaseLogin(object):

    @allure.story('登录模块下的子模块: test1')
    def test_case_01(self):
        assert 1

    @allure.story('登录模块下的子模块: test1')
    def test_case_02(self):
        assert 1

    @allure.story('登录模块下的子模块: test2')
    def test_case_03(self):
        assert 1

    @allure.story('登录模块下的子模块: test3')
    def test_case_04(self):
        assert 1

@allure.feature('注册模块')
class TestCaseRegister(object):
    @allure.story('注册模块下的子模块: test1')
    def test_case_01(self):
        assert 1

    @allure.story('注册模块下的子模块: test1')
    def test_case_02(self):
        assert 1

    @allure.story('注册模块下的子模块: test1')
    def test_case_03(self):
        assert 1

    @allure.story('注册模块下的子模块: test2')
    def test_case_04(self):
        assert 1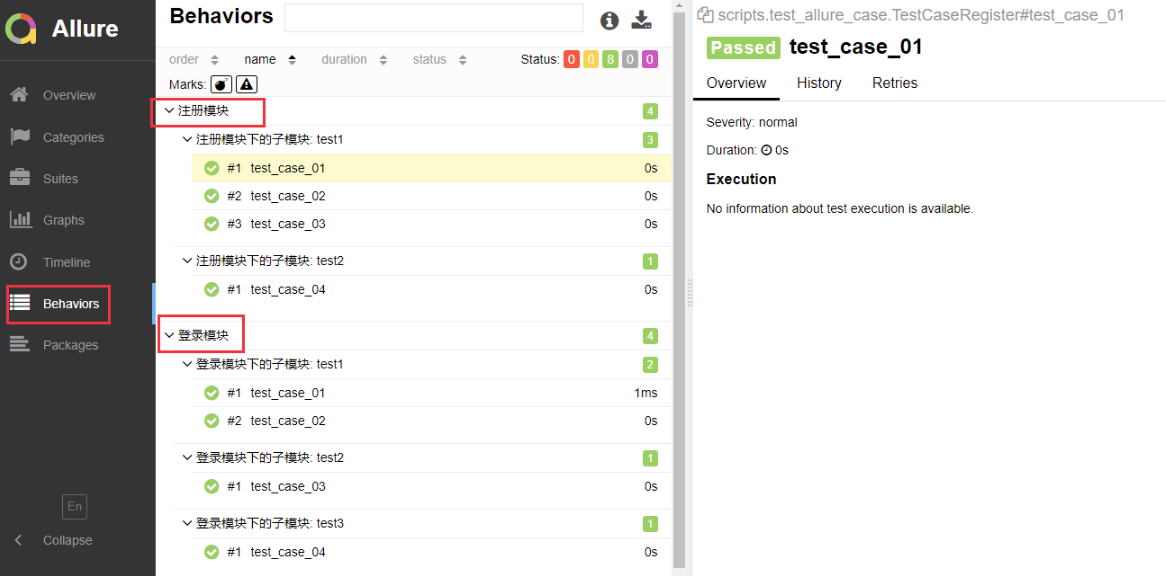
由上图可以看到,不同的用例被分为不同的功能中。
allure.severity
allure.severity用来标识测试用例或者测试类的级别,分为blocker,critical,normal,minor,trivial5个级别。
import pytest
import allure

@allure.feature('登录模块')
class TestCaseLogin(object):

    @allure.severity(allure.severity_level.BLOCKER)
    def test_case_01(self):
        assert 1

    @allure.severity(allure.severity_level.CRITICAL)
    def test_case_02(self):
        assert 1

    @allure.severity(allure.severity_level.MINOR)
    def test_case_03(self):
        assert 1

    @allure.severity(allure.severity_level.TRIVIAL)
    def test_case_04(self):
        assert 1

    def test_case_05(self):
        assert 1
severity的默认级别是normal,所以上面的用例5可以不添加装饰器了。
allure.dynamic
import pytest
import allure

@allure.feature('登录模块')
class TestCaseLogin(object):

    @allure.severity(allure.severity_level.BLOCKER)
    def test_case_01(self):
        assert 1

    @allure.severity(allure.severity_level.CRITICAL)
    def test_case_02(self):
        assert 1

    @allure.severity(allure.severity_level.MINOR)
    def test_case_03(self):
        assert 1

    @allure.severity(allure.severity_level.TRIVIAL)
    def test_case_04(self):
        assert 1
    @pytest.mark.parametrize('name', ['动态名称1', '动态名称2'])
    def test_case_05(self, name):
        allure.dynamic.title(name)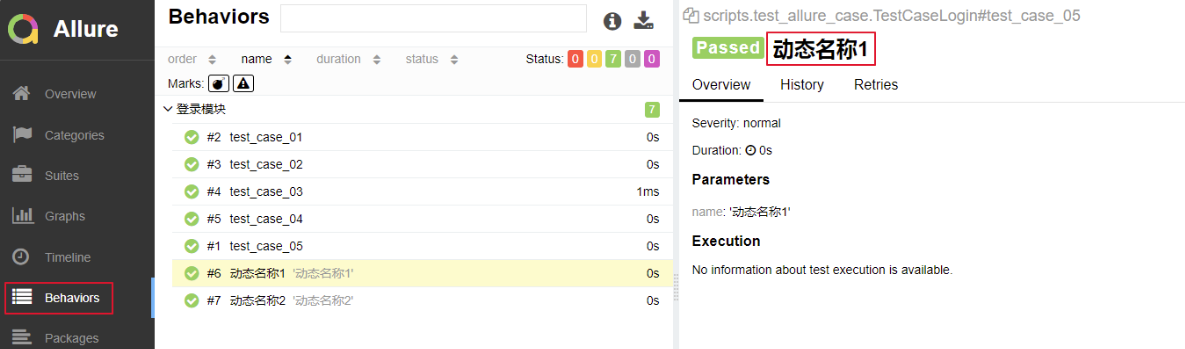
控制用例执行顺序
在之前,用例的执行顺序是从上到下依次执行:
import pytest

class TestCaseClass(object):
    def test_case_03(self):
        print('执行用例03.......')
        assert 1

def test_case01():
    print('执行用例01.......')
    assert 1  # 断成功

def test_case02():
    print('执行用例02.......')
assert 1 # 断言成功正如上例的执行顺序是3 1 2。
现在,来看看我们如何手动控制多个用例的执行顺序,这里也依赖一个插件。
下载
pip install pytest-ordering使用
import pytest

class TestCaseClass(object):
    @pytest.mark.run(order=3)
    def test_case_03(self):
        print('执行用例03.......')
        assert 1

@pytest.mark.run(order=2)
def test_case01():
    print('执行用例01.......')
    assert 1  # 断言成功

@pytest.mark.run(order=1)
def test_case02():
    print('执行用例02.......')
    assert 1  # 断言成功
手动控制用例执行顺序的方法是在给各用例添加一个装饰器:
@pytest.mark.run(order=x) # x 是一个整数那么, 现在的执行顺序是2 1 3,按照order指定的排序执行的。
如果有人较劲传个0或者负数啥的,那么它们的排序关系应该是这样的:
0 > 正数 > 没有参与的用例 > 负数
# 正数和负数就是按照大小关系排列的
失败重试
失败重试意思是指定某个用例执行失败可以重新运行。
下载
pip install pytest-rerunfailures使用
需要在pytest.ini文件中, 配置:
[pytest]
addopts = -s --html=report/report.html --reruns=3
;addopts = -s --alluredir ./report/result
testpaths = ./scripts/
python_files = test_case_01.py
python_classes = Test*
python_functions = test_*给addopts字段新增(其他原有保持不变)--reruns=3字段,这样如果有用例执行失败,则再次执行,尝试3次。
来看示例:
import pytest

def test_case01():
    print('执行用例01.......')
    assert 1  # 断言成功

def test_case02():
    print('执行用例02.......')
    assert 0  # 断言失败,需要重新执行

class TestCaseClass(object):

    def test_case_03(self):
        print('执行用例03.......')
        assert 1
结果:
M:\py_tests>pytest
======================================================= test session starts ========================================================
platform win32 -- Python 3.6.2, pytest-5.2.2, py-1.8.0, pluggy-0.13.0
rootdir: M:\py_tests, inifile: pytest.ini, testpaths: ./scripts/
plugins: allure-pytest-2.8.6, html-2.0.0, metadata-1.8.0, ordering-0.6, rerunfailures-7.0
collected 3 items

scripts\test_case_01.py 执行用例01.......
.执行用例02.......
R执行用例02.......
R执行用例02.......
R执行用例02.......
F执行用例03.......
.

============================================================= FAILURES =============================================================
___________________________________________________________ test_case02 ____________________________________________________________

    def test_case02():
        print('执行用例02.......')
>       assert 0  # 断言失败,需要重新执行
E       assert 0

scripts\test_case_01.py:19: AssertionError
------------------------------------ generated html file: file://M:\py_tests\report\report.html ------------------------------------
=============================================== 1 failed, 2 passed, 3 rerun in 0.20s ===============================================
我们也可以从用例报告中看出重试的结果:

上面演示了用例失败了,然后重新执行多少次都没有成功,这是一种情况。
接下来,来看另一种情况,那就是用例执行失败,重新执行次数内通过了,那么剩余的重新执行的次数将不再执行。
import random
import pytest

def test_case01():
    print('执行用例01.......')
    assert 1  # 断言成功

def test_case02():
    print('执行用例02.......')
    status = random.randint(0, 2)
    if status:
        assert 1  # 断言成功,无需再重复执行了
    else:
        assert 0  # 断言失败,需要重新执行
class TestCaseClass(object):

    def test_case_03(self):
        print('执行用例03.......')
assert 1通过random模块帮助我们演示出在某次执行中出现失败的情况,而在重新执行的时候,会出现成功的情况,看结果:
M:\py_tests>pytest
======================================================= test session starts ========================================================
platform win32 -- Python 3.6.2, pytest-5.2.2, py-1.8.0, pluggy-0.13.0
rootdir: M:\py_tests, inifile: pytest.ini, testpaths: ./scripts/
plugins: allure-pytest-2.8.6, html-2.0.0, metadata-1.8.0, ordering-0.6, rerunfailures-7.0
collected 3 items

scripts\test_case_01.py 执行用例01.......
.执行用例02.......
R执行用例02.......
.执行用例03.......
.

------------------------------------ generated html file: file://M:\py_tests\report\report.html ------------------------------------
==================================================== 3 passed, 1 rerun in 0.08s ====================================================可以看到,用例02重新执行了一次就成功了,剩余的两次执行就终止了。
并发执行
一条一条用例的执行,肯定会很慢,来看如何并发的执行测试用例,当然这需要相应的插件。
下载
pip install pytest-xdist使用
在配置文件中添加:
[pytest]
addopts =  -v -s --html=report/report.html -n=auto
;addopts = -s --alluredir ./report/result
testpaths = ./scripts/
python_files = test_case_01.py
python_classes = Test*
python_functions = test_*就是这个-n=auto:
-n=auto,自动侦测系统里的CPU数目。-n=numprocesses,也就是自己指定运行测试用例的进程数。
并发的配置可以写在配置文件中,然后其他正常的执行用例脚本即可。另外一种就是在终端中指定,先来看示例:
import pytest

def test_case01():
    print('执行用例01.......')
    assert 1  # 断言成功


@pytest.mark.skipif(condition= 2 > 1, reason='跳过用例')
def test_case02():
    print('执行用例02.......')
    assert 0  # 断言失败

class TestCaseClass(object):

    def test_case_03(self):
        print('执行用例03.......')
        assert 1

    def test_case_04(self):
        print('执行用例04.......')
        assert 1
结果:
M:\py_tests>pytest .\scripts\test_case_01.py -s -n auto
======================================================= test session starts ========================================================
platform win32 -- Python 3.6.2, pytest-5.2.2, py-1.8.0, pluggy-0.13.0 -- c:\python36\python.exe
cachedir: .pytest_cache
metadata: {'Python': '3.6.2', 'Platform': 'Windows-10-10.0.14393-SP0', 'Packages': {'pytest': '5.2.2', 'py': '1.8.0', 'pluggy': '0.13
.0'}, 'Plugins': {'allure-pytest': '2.8.6', 'forked': '1.1.3', 'html': '2.0.0', 'metadata': '1.8.0', 'ordering': '0.6', 'rerunfailure
s': '7.0', 'xdist': '1.30.0'}, 'JAVA_HOME': 'C:\\Program Files\\Java\\jdk1.8.0_201'}
rootdir: M:\py_tests, inifile: pytest.ini
plugins: allure-pytest-2.8.6, forked-1.1.3, html-2.0.0, metadata-1.8.0, ordering-0.6, rerunfailures-7.0, xdist-1.30.0
[gw0] win32 Python 3.6.2 cwd: M:\py_tests
[gw1] win32 Python 3.6.2 cwd: M:\py_tests
[gw2] win32 Python 3.6.2 cwd: M:\py_tests
[gw3] win32 Python 3.6.2 cwd: M:\py_tests
[gw0] Python 3.6.2 (v3.6.2:5fd33b5, Jul  8 2017, 04:14:34) [MSC v.1900 32 bit (Intel)]
[gw1] Python 3.6.2 (v3.6.2:5fd33b5, Jul  8 2017, 04:14:34) [MSC v.1900 32 bit (Intel)]
[gw2] Python 3.6.2 (v3.6.2:5fd33b5, Jul  8 2017, 04:14:34) [MSC v.1900 32 bit (Intel)]
[gw3] Python 3.6.2 (v3.6.2:5fd33b5, Jul  8 2017, 04:14:34) [MSC v.1900 32 bit (Intel)]
gw0 [4] / gw1 [4] / gw2 [4] / gw3 [4]
scheduling tests via LoadScheduling

scripts/test_case_01.py::test_case02
scripts/test_case_01.py::TestCaseClass::test_case_04
scripts/test_case_01.py::TestCaseClass::test_case_03
scripts/test_case_01.py::test_case01
[gw3] PASSED scripts/test_case_01.py::TestCaseClass::test_case_04
[gw0] PASSED scripts/test_case_01.py::test_case01
[gw2] PASSED scripts/test_case_01.py::TestCaseClass::test_case_03
[gw1] SKIPPED scripts/test_case_01.py::test_case02

------------------------------------ generated html file: file://M:\py_tests\report\report.html ------------------------------------
=================================================== 3 passed, 1 skipped in 2.23s ===================================================
pytest-cov
pytest-cov 在 pytest 中增加了覆盖率支持,来显示哪些代码行已经测试过,哪些还没有。它还将包括项目的测试覆盖率。
下载
pip install pytest-cov使用
在配置文件中:
[pytest]
addopts =  -v -s --html=report/report.html -n=auto --cov=./scripts
;addopts = -s --alluredir ./report/result
testpaths = ./scripts/
python_files = test_case_01.py
python_classes = Test*
python_functions = test_*也就是配置--cov=./scripts,这样,它就会统计所有scripts目录下所有符合规则的脚本的测试覆盖率。
执行的话,就照常执行就行。
结果:
M:\py_tests>pytest
Test session starts (platform: win32, Python 3.6.2, pytest 5.2.2, p
ytest-sugar 0.9.2)
cachedir: .pytest_cache
metadata: {'Python': '3.6.2', 'Platform': 'Windows-10-10.0.14393-SP
0', 'Packages': {'pytest': '5.2.2', 'py': '1.8.0', 'pluggy': '0.13.
0'}, 'Plugins': {'allure-pytest': '2.8.6', 'cov': '2.8.1', 'forked'
: '1.1.3', 'html': '2.0.0', 'metadata': '1.8.0', 'ordering': '0.6',
 'rerunfailures': '7.0', 'sugar': '0.9.2', 'xdist': '1.30.0'}, 'JAV
A_HOME': 'C:\\Program Files\\Java\\jdk1.8.0_201'}
rootdir: M:\py_tests, inifile: pytest.ini, testpaths: ./scripts/
plugins: allure-pytest-2.8.6, cov-2.8.1, forked-1.1.3, html-2.0.0,
metadata-1.8.0, ordering-0.6, rerunfailures-7.0, sugar-0.9.2, xdist
-1.30.0
[gw0] win32 Python 3.6.2 cwd: M:\py_tests
[gw1] win32 Python 3.6.2 cwd: M:\py_tests
[gw2] win32 Python 3.6.2 cwd: M:\py_tests
[gw3] win32 Python 3.6.2 cwd: M:\py_tests
[gw0] Python 3.6.2 (v3.6.2:5fd33b5, Jul  8 2017, 04:14:34) [MSC v.1900 32 bit (Intel)]
[gw1] Python 3.6.2 (v3.6.2:5fd33b5, Jul  8 2017, 04:14:34) [MSC v.1900 32 bit (Intel)]
[gw2] Python 3.6.2 (v3.6.2:5fd33b5, Jul  8 2017, 04:14:34) [MSC v.1900 32 bit (Intel)]
[gw3] Python 3.6.2 (v3.6.2:5fd33b5, Jul  8 2017, 04:14:34) [MSC v.1900 32 bit (Intel)]
gw0 [4] / gw1 [4] / gw2 [4] / gw3 [4]
scheduling tests via LoadScheduling


 scripts\test_case_01.py::test_case02 s                                                                                          50% █████
     pts\test_case_01.py::test_case01 ✓                                                                                          25% ██▌
    ] PASSED scripts/test_case_01.py


 scripts\test_case_01.py::TestCaseClass.test_case_03 ✓                                                                           75% ████
███▌

 scripts\test_case_01.py::TestCaseClass.test_case_04 ✓                                                                          100% ████
██████ scripts/test_case_01.py
            Coverage.py warning: No data was collected. (no-data-collected)


----------------------------------------- generated html file: file://M:\py_tests\report\report.html -----------------------------------------

----------- coverage: platform win32, python 3.6.2-final-0 -----------
Name                          Stmts   Miss  Cover
-------------------------------------------------
scripts\demo1.py                  4      4     0%
scripts\test_allure_case.py       7      7     0%
scripts\test_case_01.py          15      2    87%
-------------------------------------------------
TOTAL                            26     13    50%


Results (2.58s):
       3 passed
       1 skipped
pytest-sugar
pytest-sugar 改变了 pytest 的默认外观,添加了一个进度条,并立即显示失败的测试。它不需要配置,只需 pip install pytest-sugar,用 pytest 运行测试,来享受更漂亮、更有用的输出。
pytest-picked
pytest-picked 对你已经修改但尚未提交 git 的代码运行测试。安装库并运行 pytest --picked 来仅测试自上次提交后已更改的文件。
pytest-instafail
pytest-instafail 修改 pytest 的默认行为来立即显示失败和错误,而不是等到 pytest 完成所有测试。
pytest-tldr
一个全新的 pytest 插件,可以将输出限制为你需要的东西。pytest-tldr(tldr 代表 “too long, didn’t read” —— 太长,不想读),就像 pytest-sugar 一样,除基本安装外不需要配置。不像 pytest 的默认输出那么详细,pytest-tldr 将默认输出限制为失败测试的回溯信息,并忽略了一些令人讨厌的颜色编码。添加 -v 标志会为喜欢它的人返回更详细的输出。
pytest-xdist
pytest-xdist 允许你通过 -n 标志并行运行多个测试:例如,pytest -n 2 将在两个 CPU 上运行你的测试。这可以显著加快你的测试速度。它还包括 --looponfail 标志,它将自动重新运行你的失败测试。
pytest-django
pytest-django 为 Django 应用和项目添加了 pytest 支持。具体来说,pytest-django 引入了使用 pytest fixture 测试 Django 项目的能力,而省略了导入 unittest 和复制/粘贴其他样板测试代码的需要,并且比标准的 Django 测试套件运行得更快。
django-test-plus
django-test-plus 并不是专门为 pytest 开发,但它现在支持 pytest。它包含自己的 TestCase类,你的测试可以继承该类,并使你能够使用较少的按键来输出频繁的测试案例,例如检查特定的 HTTP 错误代码。
我们上面提到的库绝不是你扩展 pytest 的唯一选择。有用的 pytest 插件的前景是广阔的。查看 pytest 插件兼容性页面来自行探索。你最喜欢哪些插件?