kubernetes
Kubernetes(K8s)是 CNCF 托管的开源容器编排平台,提供自动化部署、弹性伸缩、服务发现和滚动更新等能力。本文介绍高可用集群的核心组件架构、节点角色划分以及集群安装配置步骤。
Kubernetes高可用集群安装
简介
基本概念
- Master:Master 节点是 Kubernetes 集群的控制节点,负责整个集群的管理和控制。Master 节点上包含以下组件:
- kube-apiserver:集群控制的入口,提供 HTTP REST 服务
- kube-controller-manager:Kubernetes 集群中所有资源对象的自动化控制中心
- kube-scheduler:负责 Pod 的调度
- Node:Node 节点是 Kubernetes 集群中的工作节点,Node 上的工作负载由 Master 节点分配,工作负载主要是运行容器应用。Node 节点上包含以下组件:
- kubelet:负责 Pod 的创建、启动、监控、重启、销毁等工作,同时与 Master 节点协作,实现集群管理的基本功能。
- kube-proxy:实现 Kubernetes Service 的通信和负载均衡
- 运行容器化(Pod)应用
- Pod: Pod 是 Kubernetes 最基本的部署调度单元。每个 Pod 可以由一个或多个业务容器和一个根容器(Pause 容器)组成。一个 Pod 表示某个应用的一个实例
- ReplicaSet:是 Pod 副本的抽象,用于解决 Pod 的扩容和伸缩
- Deployment:Deployment 表示部署,在内部使用ReplicaSet 来实现。可以通过 Deployment 来生成相应的 ReplicaSet 完成 Pod 副本的创建
- Service:Service 是 Kubernetes 最重要的资源对象。Kubernetes 中的 Service 对象可以对应微服务架构中的微服务。Service 定义了服务的访问入口,服务的调用者通过这个地址访问 Service 后端的 Pod 副本实例。Service 通过 Label Selector 同后端的 Pod 副本建立关系,Deployment 保证后端Pod 副本的数量,也就是保证服务的伸缩性。
Kubernetes 主要由以下几个核心组件组成:
- etcd 保存了整个集群的状态,就是一个数据库;
- apiserver 提供了资源操作的唯一入口,并提供认证、授权、访问控制、API 注册和发现等机制;
- controller manager 负责维护集群的状态,比如故障检测、自动扩展、滚动更新等;
- scheduler 负责资源的调度,按照预定的调度策略将 Pod 调度到相应的机器上;
- kubelet 负责维护容器的生命周期,同时也负责 Volume(CSI)和网络(CNI)的管理;
- Container runtime 负责镜像管理以及 Pod 和容器的真正运行(CRI);
- kube-proxy 负责为 Service 提供 cluster 内部的服务发现和负载均衡;
除了上面的这些核心组件,还有一些推荐的插件:
- kube-dns 负责为整个集群提供 DNS 服务
- Ingress Controller 为服务提供外网入口
- 提供资源监控
- Dashboard 提供 GUI
组件通信
Kubernetes 多组件之间的通信原理:
- apiserver 负责 etcd 存储的所有操作,且只有 apiserver 才直接操作 etcd 集群
- apiserver 对内(集群中的其他组件)和对外(用户)提供统一的 REST API,其他组件均通过 apiserver 进行通信
- controller manager、scheduler、kube-proxy 和 kubelet 等均通过 apiserver watch API 监测资源变化情况,并对资源作相应的操作
- 所有需要更新资源状态的操作均通过 apiserver 的 REST API 进行
- apiserver 也会直接调用 kubelet API(如 logs, exec, attach 等),默认不校验 kubelet 证书,但可以通过
--kubelet-certificate-authority开启(而 GKE 通过 SSH 隧道保护它们之间的通信)
Pod创建流程
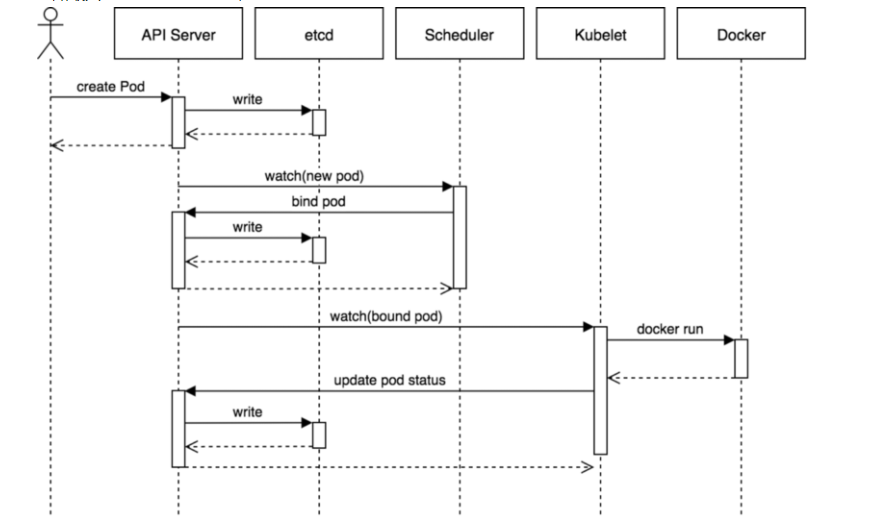
- 用户通过 REST API 创建一个 Pod
- apiserver 将其写入 etcd
- scheduluer 检测到未绑定 Node 的 Pod,开始调度并更新 Pod 的 Node 绑定
- kubelet 检测到有新的 Pod 调度过来,通过 container runtime 运行该 Pod
- kubelet 通过 container runtime 取到 Pod 状态,并更新到 apiserver 中
kubectl -n kubernetes-dashboard get secret $(kubectl -n kubernetes-dashboard get sa/admin-user -o jsonpath="{.secrets[0].name}") -o go-template="{{.data.token | base64decode}}"
集群模式
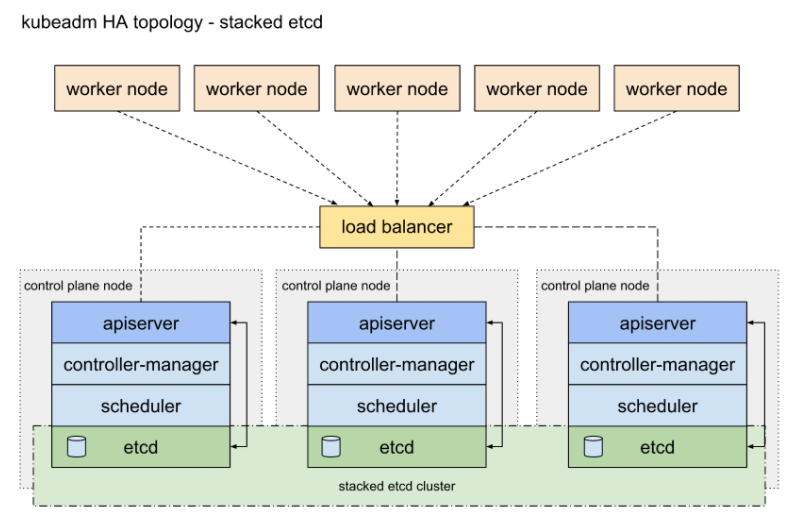
根据k8s社区的文档及官方文档参考,可以HA拓扑分为两种模式
- Stacked etcd topology(堆叠ETCD)
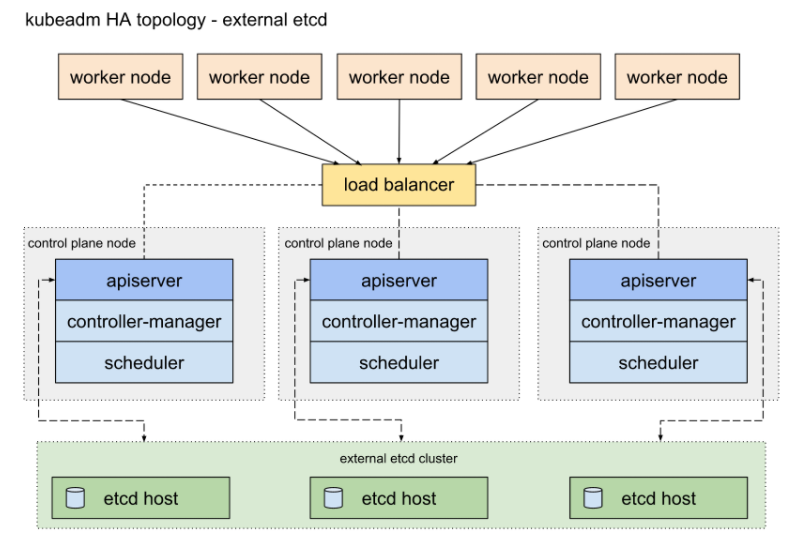
- External etcd topology(外部ETCD)
堆叠ETCD
每个master节点上运行一个apiserver和etcd, etcd只与本节点apiserver通信
外部ETCD
etcd集群运行在单独的主机上,每个etcd都与apiserver节点通信。
环境准备
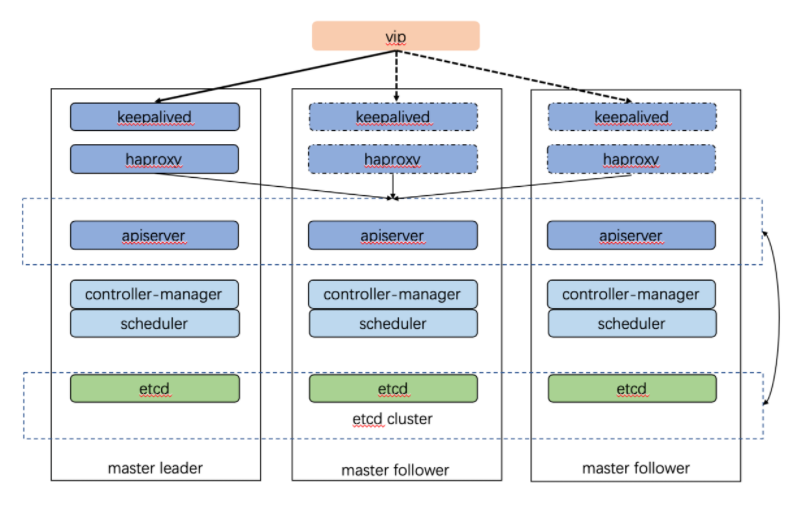
- 由外部负载均衡器提供一个vip,流量负载到keepalived master节点上。
- 当keepalived节点出现故障, vip自动漂到其他可用节点。
- haproxy负责将流量负载到apiserver节点。
- 三个apiserver会同时工作。注意k8s中controller-manager和scheduler只会有一个工作,其余处于backup状态。我猜测apiserver主要是读写数据库,数据一致性的问题由数据库保证,此外apiserver是k8s中最繁忙的组件,多个同时工作也有利于减轻压力。而controller-manager和scheduler主要处理执行逻辑,多个大脑同时运作可能会引发混乱。
| 主机名 | IP地址 | 角色 | 配置 |
|---|---|---|---|
| master1 | 192.168.10.241 | master节点 | 4H4G 50G |
| master2 | 192.168.10.242 | master节点 | 4H4G 50G |
| master3 | 192.168.10.243 | master节点 | 4H4G 50G |
| node1 | 192.168.10.244 | worker节点 | 8H8G 50G |
| node2 | 192.168.10.245 | worker节点 | 8H8G 50G |
| node3 | 192.168.10.246 | worker节点 | 8H8G 50G |
| master-lb | 192.168.10.240 | VIP | VIP不占用机器 |
版本信息
| 信息 | 备注 |
|---|---|
| 系统版本 | CentOS Linux release 7.9.2009 (Core) |
| docker版本 | Docker version 20.10.8, build 3967b7d |
| k8s版本 | 1.22.1 |
| pod网段 | 172.16.0.0/16 |
| serverice网段 | 10.96.0.0/16 |
**声明:**在以下配置中,默认已经关闭防火墙和selinux等安全策略,若没有关闭,请参考以下命令
# 查看防火墙
systemctl status firewalld

# 关闭防火墙
systemctl stop firewalld
systemctl disable firewalld

# 查看selinux
getenforce

# 关闭selinux
setenforce 0
sed -i 's/SELINUX=enforcing/SELINUX=disabled/g' /etc/selinux/config
基本配置
- 以下配置信息在所有节点通用,因此只列出一台机器的
- ssh互信要保证集群中的每台节点都可以访问集群中的任意节点
修改主机名
# master1节点
hostnamectl set-hostname master1

# master2节点
hostnamectl set-hostname master2

# master3节点
hostnamectl set-hostname master3

# node1节点
hostnamectl set-hostname node1

# node2节点
hostnamectl set-hostname node2

# node3节点
hostnamectl set-hostname node3
配置hosts文件解析
cat > /etc/hosts <<EOF
127.0.0.1   localhost localhost.localdomain localhost4 localhost4.localdomain4
::1         localhost localhost.localdomain localhost6 localhost6.localdomain6
192.168.10.240  master-lb
192.168.10.241  master1
192.168.10.242  master2
192.168.10.243  master3
192.168.10.244  node1
192.168.10.245  node2
192.168.10.246  node3
EOF


# 必备工具安装
配置ssh互信
# ssh互信
ssh-keygen -t rsa		# 生成证书文件
ssh-copy-id master1		# 将证书文件拷贝到所有的机器
ssh-copy-id master2
ssh-copy-id master3
ssh-copy-id node1
ssh-copy-id node2
ssh-copy-id node3

# ssh批量复制, 从网上找的脚本,未验证
# 执行脚本之前,记得先执行这条命令生成公匙:ssh-keygen -t rsa

#!/bin/bash

password=123456
for i in {241,242,243,244,245,246}
  do
    expect <<-EOF
    set timeout 5
    spawn ssh-copy-id -i [email protected].$i
    expect {
    "password:" { send "$password\n" }
    }
  interact
  expect eof
EOF
done
关闭swap分区
swapoff -a && sysctl -w vm.swappiness=0
sed -ri '/^[^#]*swap/s@^@#@' /etc/fstab
Docker安装
# 配置epel源
wget -O /etc/yum.repos.d/epel.repo http://mirrors.aliyun.com/repo/epel-7.repo

# 安装必要的一些系统工具
yum install -y wget jq psmisc vim* net-tools telnet git curl unzip lrzsz bash* openssl*
yum install -y yum-utils device-mapper-persistent-data lvm2

# 添加阿里云的docker源信息
yum-config-manager --add-repo https://mirrors.aliyun.com/docker-ce/linux/centos/docker-ce.repo
sed -i 's+download.docker.com+mirrors.aliyun.com/docker-ce+' /etc/yum.repos.d/docker-ce.repo

# 更新并安装Docker-CE
yum makecache fast
yum -y install docker-ce

# 配置镜像加速器

mkdir -p /etc/docker
tee /etc/docker/daemon.json <<-'EOF'
{
    "exec-opts": ["native.cgroupdriver=systemd"],
    "log-driver": "json-file",
    "log-opts": {
      "max-size": "100m"
    },
    "storage-driver": "overlay2",
    "storage-opts": [
      "overlay2.override_kernel_check=true"
    ],
    "registry-mirrors": ["https://gziwmbaz.mirror.aliyuncs.com"]
}
EOF

# 注意:k8s1.22版本需要配置容器运行时驱动,之前版本使用的是cgroupfs,现在需要修改为systemd,不然集群初始化会报错

# 启动docker并设置开机启动
systemctl daemon-reload
systemctl restart docker
systemctl enable docker

# 注意:
# 官方软件源默认启用了最新的软件,您可以通过编辑软件源的方式获取各个版本的软件包。例如官方并没有将测试版本的软件源置为可用,您可以通过以下方式开启。同理可以开启各种测试版本等。
# vim /etc/yum.repos.d/docker-ce.repo
#   将[docker-ce-test]下方的enabled=0修改为enabled=1
#
# 安装指定版本的Docker-CE:
# Step 1: 查找Docker-CE的版本:
# yum list docker-ce.x86_64 --showduplicates | sort -r
#   Loading mirror speeds from cached hostfile
#   Loaded plugins: branch, fastestmirror, langpacks
#   docker-ce.x86_64            17.03.1.ce-1.el7.centos            docker-ce-stable
#   docker-ce.x86_64            17.03.1.ce-1.el7.centos            @docker-ce-stable
#   docker-ce.x86_64            17.03.0.ce-1.el7.centos            docker-ce-stable
#   Available Packages
# Step2: 安装指定版本的Docker-CE: (VERSION例如上面的17.03.0.ce.1-1.el7.centos)
# sudo yum -y install docker-ce-[VERSION]
Kubernetes源
# 配置阿里云的k8s源
cat <<EOF > /etc/yum.repos.d/kubernetes.repo
[kubernetes]
name=Kubernetes
baseurl=https://mirrors.aliyun.com/kubernetes/yum/repos/kubernetes-el7-x86_64/
enabled=1
gpgcheck=1
repo_gpgcheck=1
gpgkey=https://mirrors.aliyun.com/kubernetes/yum/doc/yum-key.gpg https://mirrors.aliyun.com/kubernetes/yum/doc/rpm-package-key.gpg
EOF

# 安装kubeadm工具
yum install -y kubelet kubeadm kubectl
systemctl enable kubelet && systemctl start kubelet

# node节点kubectl可选安装
NTP服务器搭建
# 安装ntp服务
# 集群中一台服务器配置ntpd时间服务器,其他节点同步时间即可
yum -y install ntp*

# 编辑文件 "/etc/ntp.conf",根据情况修改文件内容为:

driftfile  /var/lib/ntp/drift
pidfile   /var/run/ntpd.pid
logfile /var/log/ntp.log
restrict    default kod nomodify notrap nopeer noquery
restrict -6 default kod nomodify notrap nopeer noquery
restrict 127.0.0.1
server 127.127.1.0
fudge  127.127.1.0 stratum 10
server ntp.aliyun.com iburst minpoll 4 maxpoll 10
restrict ntp.aliyun.com nomodify notrap nopeer noquery

systemctl start ntpd
systemctl enable ntpd

ntpdate 192.168.10.241


# 其他节点时间同步
# 将集群中的某台机器配置为NTP服务器,具体配置信息请参考下面的配置NTP服务器的搭建,并配置定时任务同步时间
yum -y install ntpdate

# 手动验证
[root@master2 ~]# ntpdate master1
10 Sep 09:31:21 ntpdate[794]: adjust time server 192.168.10.241 offset 0.003334 sec

# 配置计划任务
[root@master2 ~]# crontab -e
*/1 * * * * ntpdate master1 > /dev/null 2>&1
内核配置
# 所有节点安装ipvsadm
yum install ipvsadm ipset sysstat conntrack libseccomp -y

# 开启一些k8s集群中必须的内核参数,所有节点配置k8s内核
[root@master01 ~]# cat > /etc/sysctl.d/k8s.conf <<EOF
net.ipv4.ip_forward = 1
net.bridge.bridge-nf-call-iptables = 1
net.bridge.bridge-nf-call-ip6tables = 1
fs.may_detach_mounts = 1
vm.overcommit_memory=1
vm.panic_on_oom=0
fs.inotify.max_user_watches=89100
fs.file-max=52706963
fs.nr_open=52706963
net.netfilter.nf_conntrack_max=2310720
net.ipv4.tcp_keepalive_time = 600
net.ipv4.tcp_keepalive_probes = 3
net.ipv4.tcp_keepalive_intvl =15
net.ipv4.tcp_max_tw_buckets = 36000
net.ipv4.tcp_tw_reuse = 1
net.ipv4.tcp_max_orphans = 327680
net.ipv4.tcp_orphan_retries = 3
net.ipv4.tcp_syncookies = 1
net.ipv4.tcp_max_syn_backlog = 16384
net.ipv4.ip_conntrack_max = 65536
net.ipv4.tcp_max_syn_backlog = 16384
net.ipv4.tcp_timestamps = 0
net.core.somaxconn = 16384
EOF

# 应用上面的配置

sysctl --system

# k8s网络组件,需要设置内核参数 bridge-nf-call-iptables=1,修改这个参数需要系统有br_netfilter模块。
高可用组件安装
HAProxy
- 官网
- 安装
- yum -y install haproxy*
配置文件,仅供参考
# 配置文件如下所示,三台master节点配置一样
# /etc/haproxy/haproxy.cfg
#---------------------------------------------------------------------
# Global settings
#---------------------------------------------------------------------
global
    log /dev/log local0
    log /dev/log local1 notice
    daemon

#---------------------------------------------------------------------
# common defaults that all the 'listen' and 'backend' sections will
# use if not designated in their block
#---------------------------------------------------------------------
defaults
    mode                    http
    log                     global
    option                  httplog
    option                  dontlognull
    option http-server-close
    option forwardfor       except 127.0.0.0/8
    option                  redispatch
    retries                 1
    timeout http-request    10s
    timeout queue           20s
    timeout connect         5s
    timeout client          20s
    timeout server          20s
    timeout http-keep-alive 10s
    timeout check           10s

#---------------------------------------------------------------------
# apiserver frontend which proxys to the masters
#---------------------------------------------------------------------
frontend apiserver
    bind *:8443
    mode tcp
    option tcplog
    default_backend apiserver

#---------------------------------------------------------------------
# round robin balancing for apiserver
#---------------------------------------------------------------------
backend apiserver
    option httpchk GET /healthz
    http-check expect status 200
    mode tcp
    option ssl-hello-chk
    balance     roundrobin
        server master1 192.168.10.241:6443 check
        server master2 192.168.10.242:6443 check
        server master3 192.168.10.243:6443 check
# 所有master节点安装keepalived和haproxy,做高可用
yum install keepalived haproxy -y
# 所有Master节点配置HAProxy(详细配置参考HAProxy文档,所有Master节点的HAProxy配置相同):
vim /etc/haproxy/haproxy.cfg
global
maxconn 2000
ulimit-n 16384
log 127.0.0.1 local0 err
stats timeout 30s
defaults
log global
mode http
option httplog
timeout connect 5000
timeout client 50000
timeout server 50000
timeout http-request 15s
timeout http-keep-alive 15s
frontend monitor-in
bind *:33305
mode http
option httplog
monitor-uri /monitor
frontend k8s-master
bind *:8443
mode tcp
option tcplog
tcp-request inspect-delay 5s
default_backend k8s-master
backend k8s-master
mode tcp
option tcplog
option tcp-check
balance roundrobin
default-server inter 10s downinter 5s rise 2 fall 2 slowstart 60s maxconn 250 maxqueue 256 weight 100
server master1 192.168.10.41:6443 check
server master2 192.168.10.42:6443 check
server master3 192.168.10.43:6443 check
Keepalived
- 官网
- 安装
- yum -y install keepalived*
- 注意三台节点的配置不一样
配置文件,仅供参考
# master1配置
! Configuration File for keepalived

global_defs {
    router_id LVS_DEVEL
    script_user root
    enable_script_security
}

vrrp_script check_apiserver {
    script "/etc/keepalived/check_apiserver.sh"
    interval 5
    weight -5
    fall 2
    rise 1
}

vrrp_instance VI_1 {
    state MASTER		# 集群角色 MASTER/SLAVE
    interface eth0		# 网卡名
    mcast_src_ip 192.168.10.241	# 需要修改为当前节点的ip
    virtual_router_id 51
    priority 101
    advert_int 2
    authentication {
        auth_type PASS
        auth_pass K8SHA_KA_AUTH
    }
    virtual_ipaddress {
        192.168.10.240	# 虚拟ip
    }
# 以下先注释,等集群启动后再打开
#    track_script {
#       check_apiserver
#    }
}
/etc/keepalived/check_apiserver.sh 进程检查脚本
#!/bin/bash
err=0
for k in $(seq 1 3)
do
    check_code=$(pgrep haproxy)
    if [[ $check_code == "" ]]; then
        err=$(expr $err + 1)
        sleep 1
        continue
    else
        err=0
        break
    fi
done


if [[ $err != "0" ]]; then
    echo "systemctl stop keepalived"
    /usr/bin/systemctl stop keepalived
    exit 1
else
    exit 0
fi
启动haproxy和keepalived
# haproxy启动的时候,查看状态可能会有报错,因为API Server还未初始化,所以找不到6443端口
systemctl start haproxy.service
systemctl enable haproxy.service
systemctl status haproxy.service

# ip a 可以看到虚拟ip在角色为master的节点上
systemctl start keepalived.service
systemctl enable keepalived.service
systemctl status keepalived.service
k8s集群初始化
kubeadm init \
--control-plane-endpoint 192.168.10.240:8443 \
--kubernetes-version=v1.19.4 \	# 指定版本,不指定默认为最新版
--service-cidr=10.96.0.0/12 \
--pod-network-cidr=172.16.0.0/16 \
--upload-certs

kubeadm init \
--control-plane-endpoint k8svip:8443 \
--service-cidr=10.96.0.0/12 \
--pod-network-cidr=10.244.0.0/16 \
--upload-certs

#提示initialized successfully!表示初始化成功
集群初始化信息
[init] Using Kubernetes version: v1.22.1
[preflight] Running pre-flight checks
[preflight] Pulling images required for setting up a Kubernetes cluster
[preflight] This might take a minute or two, depending on the speed of your internet connection
[preflight] You can also perform this action in beforehand using 'kubeadm config images pull'
[certs] Using certificateDir folder "/etc/kubernetes/pki"
[certs] Generating "ca" certificate and key
[certs] Generating "apiserver" certificate and key
[certs] apiserver serving cert is signed for DNS names [kubernetes kubernetes.default kubernetes.default.svc kubernetes.default.svc.cluster.local m
aster1] and IPs [10.96.0.1 192.168.10.241 192.168.10.240][certs] Generating "apiserver-kubelet-client" certificate and key
[certs] Generating "front-proxy-ca" certificate and key
[certs] Generating "front-proxy-client" certificate and key
[certs] Generating "etcd/ca" certificate and key
[certs] Generating "etcd/server" certificate and key
[certs] etcd/server serving cert is signed for DNS names [localhost master1] and IPs [192.168.10.241 127.0.0.1 ::1]
[certs] Generating "etcd/peer" certificate and key
[certs] etcd/peer serving cert is signed for DNS names [localhost master1] and IPs [192.168.10.241 127.0.0.1 ::1]
[certs] Generating "etcd/healthcheck-client" certificate and key
[certs] Generating "apiserver-etcd-client" certificate and key
[certs] Generating "sa" key and public key
[kubeconfig] Using kubeconfig folder "/etc/kubernetes"
[endpoint] WARNING: port specified in controlPlaneEndpoint overrides bindPort in the controlplane address
[kubeconfig] Writing "admin.conf" kubeconfig file
[endpoint] WARNING: port specified in controlPlaneEndpoint overrides bindPort in the controlplane address
[kubeconfig] Writing "kubelet.conf" kubeconfig file
[endpoint] WARNING: port specified in controlPlaneEndpoint overrides bindPort in the controlplane address
[kubeconfig] Writing "controller-manager.conf" kubeconfig file
[endpoint] WARNING: port specified in controlPlaneEndpoint overrides bindPort in the controlplane address
[kubeconfig] Writing "scheduler.conf" kubeconfig file
[kubelet-start] Writing kubelet environment file with flags to file "/var/lib/kubelet/kubeadm-flags.env"
[kubelet-start] Writing kubelet configuration to file "/var/lib/kubelet/config.yaml"
[kubelet-start] Starting the kubelet
[control-plane] Using manifest folder "/etc/kubernetes/manifests"
[control-plane] Creating static Pod manifest for "kube-apiserver"
[control-plane] Creating static Pod manifest for "kube-controller-manager"
[control-plane] Creating static Pod manifest for "kube-scheduler"
[etcd] Creating static Pod manifest for local etcd in "/etc/kubernetes/manifests"
[wait-control-plane] Waiting for the kubelet to boot up the control plane as static Pods from directory "/etc/kubernetes/manifests". This can take
up to 4m0s[apiclient] All control plane components are healthy after 20.032663 seconds
[upload-config] Storing the configuration used in ConfigMap "kubeadm-config" in the "kube-system" Namespace
[kubelet] Creating a ConfigMap "kubelet-config-1.22" in namespace kube-system with the configuration for the kubelets in the cluster
[upload-certs] Storing the certificates in Secret "kubeadm-certs" in the "kube-system" Namespace
[upload-certs] Using certificate key:
3e4ef8a5a9f1e1ecc601834c13312a2c26547580d946aab0c6d2266bb186c5c3
[mark-control-plane] Marking the node master1 as control-plane by adding the labels: [node-role.kubernetes.io/master(deprecated) node-role.kubernet
es.io/control-plane node.kubernetes.io/exclude-from-external-load-balancers][mark-control-plane] Marking the node master1 as control-plane by adding the taints [node-role.kubernetes.io/master:NoSchedule]
[bootstrap-token] Using token: wxemb7.y9akr3cevn9s3p8k
[bootstrap-token] Configuring bootstrap tokens, cluster-info ConfigMap, RBAC Roles
[bootstrap-token] configured RBAC rules to allow Node Bootstrap tokens to get nodes
[bootstrap-token] configured RBAC rules to allow Node Bootstrap tokens to post CSRs in order for nodes to get long term certificate credentials
[bootstrap-token] configured RBAC rules to allow the csrapprover controller automatically approve CSRs from a Node Bootstrap Token
[bootstrap-token] configured RBAC rules to allow certificate rotation for all node client certificates in the cluster
[bootstrap-token] Creating the "cluster-info" ConfigMap in the "kube-public" namespace
[kubelet-finalize] Updating "/etc/kubernetes/kubelet.conf" to point to a rotatable kubelet client certificate and key
[addons] Applied essential addon: CoreDNS
[endpoint] WARNING: port specified in controlPlaneEndpoint overrides bindPort in the controlplane address
[addons] Applied essential addon: kube-proxy

Your Kubernetes control-plane has initialized successfully!

To start using your cluster, you need to run the following as a regular user:

  mkdir -p $HOME/.kube
  sudo cp -i /etc/kubernetes/admin.conf $HOME/.kube/config
  sudo chown $(id -u):$(id -g) $HOME/.kube/config

Alternatively, if you are the root user, you can run:

  export KUBECONFIG=/etc/kubernetes/admin.conf

You should now deploy a pod network to the cluster.
Run "kubectl apply -f [podnetwork].yaml" with one of the options listed at:
  https://kubernetes.io/docs/concepts/cluster-administration/addons/

You can now join any number of the control-plane node running the following command on each as root:
# 现在,您可以将任意数量的控制平面节点连接为根节点,并在每个节点上运行以下命令: master加入用这个
  kubeadm join 192.168.10.240:8443 --token wxemb7.y9akr3cevn9s3p8k \
	--discovery-token-ca-cert-hash sha256:a6d1265a9f29c7dc8324cc04f60c449454332f0d537a790fff2694f884182eb2 \
	--control-plane --certificate-key 3e4ef8a5a9f1e1ecc601834c13312a2c26547580d946aab0c6d2266bb186c5c3

Please note that the certificate-key gives access to cluster sensitive data, keep it secret!
As a safeguard, uploaded-certs will be deleted in two hours; If necessary, you can use
"kubeadm init phase upload-certs --upload-certs" to reload certs afterward.

Then you can join any number of worker nodes by running the following on each as root:
# 然后,通过在每个根节点上运行以下操作,可以加入任意数量的工作节点: node节点用这个

kubeadm join 192.168.10.240:8443 --token wxemb7.y9akr3cevn9s3p8k \
	--discovery-token-ca-cert-hash sha256:a6d1265a9f29c7dc8324cc04f60c449454332f0d537a790fff2694f884182eb2
初始化完成后,需要按照指示,创建目录
mkdir -p $HOME/.kube
sudo cp -i /etc/kubernetes/admin.conf $HOME/.kube/config
sudo chown $(id -u):$(id -g) $HOME/.kube/config

echo "export KUBECONFIG=/etc/kubernetes/admin.conf" >> ~/.bash_profile
source ~/.bash_profile
master节点加入集群
此处配置一样,仅列出一台
[root@master3 ~]# kubeadm join 192.168.10.240:8443 --token wxemb7.y9akr3cevn9s3p8k \
> --discovery-token-ca-cert-hash sha256:a6d1265a9f29c7dc8324cc04f60c449454332f0d537a790fff2694f884182eb2 \
> --control-plane --certificate-key 3e4ef8a5a9f1e1ecc601834c13312a2c26547580d946aab0c6d2266bb186c5c3
[preflight] Running pre-flight checks
[preflight] Reading configuration from the cluster...
[preflight] FYI: You can look at this config file with 'kubectl -n kube-system get cm kubeadm-config -o yaml'
[preflight] Running pre-flight checks before initializing the new control plane instance
[preflight] Pulling images required for setting up a Kubernetes cluster
[preflight] This might take a minute or two, depending on the speed of your internet connection
[preflight] You can also perform this action in beforehand using 'kubeadm config images pull'
[download-certs] Downloading the certificates in Secret "kubeadm-certs" in the "kube-system" Namespace
[certs] Using certificateDir folder "/etc/kubernetes/pki"
[certs] Generating "apiserver" certificate and key
[certs] apiserver serving cert is signed for DNS names [kubernetes kubernetes.default kubernetes.default.svc kubernetes.default.svc.cluster.local m
aster3] and IPs [10.96.0.1 192.168.10.243 192.168.10.240][certs] Generating "apiserver-kubelet-client" certificate and key
[certs] Generating "front-proxy-client" certificate and key
[certs] Generating "etcd/peer" certificate and key
[certs] etcd/peer serving cert is signed for DNS names [localhost master3] and IPs [192.168.10.243 127.0.0.1 ::1]
[certs] Generating "etcd/server" certificate and key
[certs] etcd/server serving cert is signed for DNS names [localhost master3] and IPs [192.168.10.243 127.0.0.1 ::1]
[certs] Generating "etcd/healthcheck-client" certificate and key
[certs] Generating "apiserver-etcd-client" certificate and key
[certs] Valid certificates and keys now exist in "/etc/kubernetes/pki"
[certs] Using the existing "sa" key
[kubeconfig] Generating kubeconfig files
[kubeconfig] Using kubeconfig folder "/etc/kubernetes"
[endpoint] WARNING: port specified in controlPlaneEndpoint overrides bindPort in the controlplane address
[kubeconfig] Writing "admin.conf" kubeconfig file
[endpoint] WARNING: port specified in controlPlaneEndpoint overrides bindPort in the controlplane address
[kubeconfig] Writing "controller-manager.conf" kubeconfig file
[endpoint] WARNING: port specified in controlPlaneEndpoint overrides bindPort in the controlplane address
[kubeconfig] Writing "scheduler.conf" kubeconfig file
[control-plane] Using manifest folder "/etc/kubernetes/manifests"
[control-plane] Creating static Pod manifest for "kube-apiserver"
[control-plane] Creating static Pod manifest for "kube-controller-manager"
[control-plane] Creating static Pod manifest for "kube-scheduler"
[check-etcd] Checking that the etcd cluster is healthy
[kubelet-start] Writing kubelet configuration to file "/var/lib/kubelet/config.yaml"
[kubelet-start] Writing kubelet environment file with flags to file "/var/lib/kubelet/kubeadm-flags.env"
[kubelet-start] Starting the kubelet
[kubelet-start] Waiting for the kubelet to perform the TLS Bootstrap...
[etcd] Announced new etcd member joining to the existing etcd cluster
[etcd] Creating static Pod manifest for "etcd"
[etcd] Waiting for the new etcd member to join the cluster. This can take up to 40s
The 'update-status' phase is deprecated and will be removed in a future release. Currently it performs no operation
[mark-control-plane] Marking the node master3 as control-plane by adding the labels: [node-role.kubernetes.io/master(deprecated) node-role.kubernet
es.io/control-plane node.kubernetes.io/exclude-from-external-load-balancers][mark-control-plane] Marking the node master3 as control-plane by adding the taints [node-role.kubernetes.io/master:NoSchedule]

This node has joined the cluster and a new control plane instance was created:

* Certificate signing request was sent to apiserver and approval was received.
* The Kubelet was informed of the new secure connection details.
* Control plane (master) label and taint were applied to the new node.
* The Kubernetes control plane instances scaled up.
* A new etcd member was added to the local/stacked etcd cluster.

To start administering your cluster from this node, you need to run the following as a regular user:

	mkdir -p $HOME/.kube
	sudo cp -i /etc/kubernetes/admin.conf $HOME/.kube/config
	sudo chown $(id -u):$(id -g) $HOME/.kube/config

Run 'kubectl get nodes' to see this node join the cluster.
node节点加入集群
此处配置一样,仅列出一台
[root@node3 ~]# kubeadm join 192.168.10.240:8443 --token wxemb7.y9akr3cevn9s3p8k \
> --discovery-token-ca-cert-hash sha256:a6d1265a9f29c7dc8324cc04f60c449454332f0d537a790fff2694f884182eb2
[preflight] Running pre-flight checks
[preflight] Reading configuration from the cluster...
[preflight] FYI: You can look at this config file with 'kubectl -n kube-system get cm kubeadm-config -o yaml'
[kubelet-start] Writing kubelet configuration to file "/var/lib/kubelet/config.yaml"
[kubelet-start] Writing kubelet environment file with flags to file "/var/lib/kubelet/kubeadm-flags.env"
[kubelet-start] Starting the kubelet
[kubelet-start] Waiting for the kubelet to perform the TLS Bootstrap...

This node has joined the cluster:
* Certificate signing request was sent to apiserver and a response was received.
* The Kubelet was informed of the new secure connection details.

Run 'kubectl get nodes' on the control-plane to see this node join the cluster.
查看集群状态
[root@master1 ~]# kubectl get nodes
NAME      STATUS     ROLES                  AGE   VERSION
master1   NotReady   control-plane,master   38m   v1.22.1
master2   NotReady   control-plane,master   21m   v1.22.1
master3   NotReady   control-plane,master   22m   v1.22.1
node1     NotReady   <none>                 21m   v1.22.1
node2     NotReady   <none>                 21m   v1.22.1
node3     NotReady   <none>                 21m   v1.22.1

# 由于未配置网络,所以目前集群未启动
k8s网络配置
flannel网络组件
链接:https://github.com/coreos/flannel
简介:
由CoreOS开发的项目Flannel,可能是最直接和最受欢迎的CNI插件。它是容器编排系统中最成熟的网络结构示例之一,旨在实现更好的容器间和主机间网络。随着CNI概念的兴起,Flannel CNI插件算是早期的入门。
与其他方案相比,Flannel相对容易安装和配置。它被打包为单个二进制文件flanneld,许多常见的Kubernetes集群部署工具和许多Kubernetes发行版都可以默认安装Flannel。Flannel可以使用Kubernetes集群的现有etcd集群来使用API存储其状态信息,因此不需要专用的数据存储。
Flannel配置第3层IPv4 overlay网络。它会创建一个大型内部网络,跨越集群中每个节点。在此overlay网络中,每个节点都有一个子网,用于在内部分配IP地址。在配置pod时,每个节点上的Docker桥接口都会为每个新容器分配一个地址。同一主机中的Pod可以使用Docker桥接进行通信,而不同主机上的pod会使用flanneld将其流量封装在UDP数据包中,以便路由到适当的目标。
Flannel有几种不同类型的后端可用于封装和路由。默认和推荐的方法是使用VXLAN,因为VXLAN性能更良好并且需要的手动干预更少。
总的来说,Flannel是大多数用户的不错选择。从管理角度来看,它提供了一个简单的网络模型,用户只需要一些基础知识,就可以设置适合大多数用例的环境。一般来说,在初期使用Flannel是一个稳妥安全的选择,直到你开始需要一些它无法提供的东西。
# 使用kubectl安装
kubectl apply -f https://raw.githubusercontent.com/coreos/flannel/2140ac876ef134e0ed5af15c65e414cf26827915/Documentation/kube-flannel.yml

# 由于网络问题,可能访问不到,具体kube-flannel.yml配置文件在文末
calico网络组件
链接:https://github.com/projectcalico/cni-plugin
简介:
Calico是Kubernetes生态系统中另一种流行的网络选择。虽然Flannel被公认为是最简单的选择,但Calico以其性能、灵活性而闻名。Calico的功能更为全面,不仅提供主机和pod之间的网络连接,还涉及网络安全和管理。Calico CNI插件在CNI框架内封装了Calico的功能。在满足系统要求的新配置的Kubernetes集群上,用户可以通过应用单个manifest文件快速部署Calico。如果您对Calico的可选网络策略功能感兴趣,可以向集群应用其他manifest,来启用这些功能。
尽管部署Calico所需的操作看起来相当简单,但它创建的网络环境同时具有简单和复杂的属性。与Flannel不同,Calico不使用overlay网络。相反,Calico配置第3层网络,该网络使用BGP路由协议在主机之间路由数据包。这意味着在主机之间移动时,不需要将数据包包装在额外的封装层中。BGP路由机制可以本地引导数据包,而无需额外在流量层中打包流量。
除了性能优势之外,在出现网络问题时,用户还可以用更常规的方法进行故障排除。虽然使用VXLAN等技术进行封装也是一个不错的解决方案,但该过程处理数据包的方式同场难以追踪。使用Calico,标准调试工具可以访问与简单环境中相同的信息,从而使更多开发人员和管理员更容易理解行为。
除了网络连接外,Calico还以其先进的网络功能而闻名。 网络策略是其最受追捧的功能之一。此外,Calico还可以与服务网格Istio集成,以便在服务网格层和网络基础架构层中解释和实施集群内工作负载的策略。这意味着用户可以配置强大的规则,描述pod应如何发送和接受流量,提高安全性并控制网络环境。
如果对你的环境而言,支持网络策略是非常重要的一点,而且你对其他性能和功能也有需求,那么Calico会是一个理想的选择。此外,如果您现在或未来有可能希望得到技术支持,那么Calico是提供商业支持的。一般来说,当您希望能够长期控制网络,而不是仅仅配置一次并忘记它时,Calico是一个很好的选择。
curl https://docs.projectcalico.org/manifests/calico.yaml -O
kubectl apply -f calico.yaml
再次查看集群状态
[root@master1 ~]# kubectl get nodes
NAME      STATUS   ROLES                  AGE   VERSION
master1   Ready    control-plane,master   43m   v1.22.1
master2   Ready    control-plane,master   27m   v1.22.1
master3   Ready    control-plane,master   28m   v1.22.1
node1     Ready    <none>                 26m   v1.22.1
node2     Ready    <none>                 26m   v1.22.1
node3     Ready    <none>                 26m   v1.22.1
修改node节点集群ROLES为空的问题
# 重新对node节点打标签即可
[root@master1 ~]# kubectl label node node1 node-role.kubernetes.io/worker=worker
node/node1 labeled
[root@master1 ~]# kubectl label node node2 node-role.kubernetes.io/worker=worker
node/node2 labeled
[root@master1 ~]# kubectl label node node3 node-role.kubernetes.io/worker=worker
node/node3 labeled
[root@master1 ~]# kubectl get nodes
NAME      STATUS   ROLES                  AGE   VERSION
master1   Ready    control-plane,master   45m   v1.22.1
master2   Ready    control-plane,master   29m   v1.22.1
master3   Ready    control-plane,master   30m   v1.22.1
node1     Ready    worker                 28m   v1.22.1
node2     Ready    worker                 28m   v1.22.1
node3     Ready    worker                 28m   v1.22.1
k8s-dashboard配置
# github地址
	https://github.com/kubernetes/dashboard

# 先将文件保存下来,修改为为外网访问
wget https://raw.githubusercontent.com/kubernetes/dashboard/v2.3.1/aio/deploy/recommended.yaml
sed -i '/targetPort: 8443/a\ \ \ \ \ \ nodePort: 30000n\ \ type: NodePort' recommended.yaml
kubectl apply -f recommended.yaml

# 该yaml文件生成后会自动创建用户,可用以下命令查看
[root@master1 ~]# kubectl describe secrets -n kubernetes-dashboard kubernetes-dashboard
Name:         kubernetes-dashboard-certs
Namespace:    kubernetes-dashboard
Labels:       k8s-app=kubernetes-dashboard
Annotations:  <none>

Type:  Opaque

Data
====

Name:         kubernetes-dashboard-csrf
Namespace:    kubernetes-dashboard
Labels:       k8s-app=kubernetes-dashboard
Annotations:  <none>

Type:  Opaque

Data
====
csrf:  256 bytes

Name:         kubernetes-dashboard-key-holder
Namespace:    kubernetes-dashboard
Labels:       <none>
Annotations:  <none>

Type:  Opaque

Data
====
priv:  1675 bytes
pub:   459 bytes

Name:         kubernetes-dashboard-token-9bg87
Namespace:    kubernetes-dashboard
Labels:       <none>
Annotations:  kubernetes.io/service-account.name: kubernetes-dashboard
              kubernetes.io/service-account.uid: eec2183d-f389-4baa-b11c-5fb7a4ea1691

Type:  kubernetes.io/service-account-token

Data
====
namespace:  20 bytes
token:      eyJhbGciOiJSUzI1NiIsImtpZCI6InYyZW5PM2xWS0tZeEQ0MjBoR0tWU18ydzhNRFFSSXpvd2h6eVZURHZ0eDQifQ.eyJpc3MiOiJrdWJlcm5ldGVzL3NlcnZpY2VhY2NvdW50
Iiwia3ViZXJuZXRlcy5pby9zZXJ2aWNlYWNjb3VudC9uYW1lc3BhY2UiOiJrdWJlcm5ldGVzLWRhc2hib2FyZCIsImt1YmVybmV0ZXMuaW8vc2VydmljZWFjY291bnQvc2VjcmV0Lm5hbWUiOiJrdWJlcm5ldGVzLWRhc2hib2FyZC10b2tlbi05Ymc4NyIsImt1YmVybmV0ZXMuaW8vc2VydmljZWFjY291bnQvc2VydmljZS1hY2NvdW50Lm5hbWUiOiJrdWJlcm5ldGVzLWRhc2hib2FyZCIsImt1YmVybmV0ZXMuaW8vc2VydmljZWFjY291bnQvc2VydmljZS1hY2NvdW50LnVpZCI6ImVlYzIxODNkLWYzODktNGJhYS1iMTFjLTVmYjdhNGVhMTY5MSIsInN1YiI6InN5c3RlbTpzZXJ2aWNlYWNjb3VudDprdWJlcm5ldGVzLWRhc2hib2FyZDprdWJlcm5ldGVzLWRhc2hib2FyZCJ9.XcAjk1drBF63MqgC6GZZcC9mgaq5VRKN9d176nRStZr_O_dQI8DiwQTEM1FFKaZgj8e-ZAYcSfsRPEisMy1Mds4JEtWprR79Ge9imnKrhRIbOKD0FEL4IaDje9z6CGxEeqsN6LWy4fbjxJzRHsqujcM2wsEETlfmYQ4N3rmZ4LYdNLJaOHKshwkQ_WjetfpYhA5Jwh_aXDWuGEtKFYmxbqnkPV3WpTZUw1LlFIeOd038Age2Ooq5xVxUfzWp2S8mSnvtY1Bp1SIXTEwCjjYpXNq6mTXeWuNJbxPE_4kBiEq7RmnMoFniLM2YuE-RFc7uLaI9I2taG0mNi50m3oFJag
ca.crt:     1099 bytes

# 注意:复制token的时候, 注意是从:后面开始复制的,空格也是token的组成部分
也可以自己手动生成token,注意name不要和已有的重复,可能会覆盖掉别人的token
kubectl create serviceaccount dashboard-admin -n kube-system
kubectl create clusterrolebinding dashboard-admin --clusterrole=cluster-admin --serviceaccount=kube-system:dashboard-admin


kubectl -n kube-system describe secret $(kubectl -n kube-system get secret | grep dashboard-admin | awk '{print $1}')
dashborad-admin.yaml文件
---
apiVersion: v1
kind: ServiceAccount
metadata:
  name: dashboard-admin
  namespace: kubernetes-dashboard

---
apiVersion: rbac.authorization.k8s.io/v1beta1
kind: ClusterRoleBinding
metadata:
  name: dashboard-admin
subjects:
- kind: ServiceAccount
  name: dashboard-admin
  namespace: kubernetes-dashboard
roleRef:
  apiGroup: rbac.authorization.k8s.io
  kind: ClusterRole
  name: cluster-admin
recommended.yaml
# 原版,未做任何修改,若想要暴露在集群外面需要手动做修改
# Copyright 2017 The Kubernetes Authors.
#
# Licensed under the Apache License, Version 2.0 (the "License");
# you may not use this file except in compliance with the License.
# You may obtain a copy of the License at
#
#     http://www.apache.org/licenses/LICENSE-2.0
#
# Unless required by applicable law or agreed to in writing, software
# distributed under the License is distributed on an "AS IS" BASIS,
# WITHOUT WARRANTIES OR CONDITIONS OF ANY KIND, either express or implied.
# See the License for the specific language governing permissions and
# limitations under the License.

apiVersion: v1
kind: Namespace
metadata:
  name: kubernetes-dashboard

---

apiVersion: v1
kind: ServiceAccount
metadata:
  labels:
    k8s-app: kubernetes-dashboard
  name: kubernetes-dashboard
  namespace: kubernetes-dashboard

---

kind: Service
apiVersion: v1
metadata:
  labels:
    k8s-app: kubernetes-dashboard
  name: kubernetes-dashboard
  namespace: kubernetes-dashboard
spec:
  ports:
    - port: 443
      targetPort: 8443
  selector:
    k8s-app: kubernetes-dashboard

---

apiVersion: v1
kind: Secret
metadata:
  labels:
    k8s-app: kubernetes-dashboard
  name: kubernetes-dashboard-certs
  namespace: kubernetes-dashboard
type: Opaque

---

apiVersion: v1
kind: Secret
metadata:
  labels:
    k8s-app: kubernetes-dashboard
  name: kubernetes-dashboard-csrf
  namespace: kubernetes-dashboard
type: Opaque
data:
  csrf: ""

---

apiVersion: v1
kind: Secret
metadata:
  labels:
    k8s-app: kubernetes-dashboard
  name: kubernetes-dashboard-key-holder
  namespace: kubernetes-dashboard
type: Opaque

---

kind: ConfigMap
apiVersion: v1
metadata:
  labels:
    k8s-app: kubernetes-dashboard
  name: kubernetes-dashboard-settings
  namespace: kubernetes-dashboard

---

kind: Role
apiVersion: rbac.authorization.k8s.io/v1
metadata:
  labels:
    k8s-app: kubernetes-dashboard
  name: kubernetes-dashboard
  namespace: kubernetes-dashboard
rules:
  # Allow Dashboard to get, update and delete Dashboard exclusive secrets.
  - apiGroups: [""]
    resources: ["secrets"]
    resourceNames: ["kubernetes-dashboard-key-holder", "kubernetes-dashboard-certs", "kubernetes-dashboard-csrf"]
    verbs: ["get", "update", "delete"]
    # Allow Dashboard to get and update 'kubernetes-dashboard-settings' config map.
  - apiGroups: [""]
    resources: ["configmaps"]
    resourceNames: ["kubernetes-dashboard-settings"]
    verbs: ["get", "update"]
    # Allow Dashboard to get metrics.
  - apiGroups: [""]
    resources: ["services"]
    resourceNames: ["heapster", "dashboard-metrics-scraper"]
    verbs: ["proxy"]
  - apiGroups: [""]
    resources: ["services/proxy"]
    resourceNames: ["heapster", "http:heapster:", "https:heapster:", "dashboard-metrics-scraper", "http:dashboard-metrics-scraper"]
    verbs: ["get"]

---

kind: ClusterRole
apiVersion: rbac.authorization.k8s.io/v1
metadata:
  labels:
    k8s-app: kubernetes-dashboard
  name: kubernetes-dashboard
rules:
  # Allow Metrics Scraper to get metrics from the Metrics server
  - apiGroups: ["metrics.k8s.io"]
    resources: ["pods", "nodes"]
    verbs: ["get", "list", "watch"]

---

apiVersion: rbac.authorization.k8s.io/v1
kind: RoleBinding
metadata:
  labels:
    k8s-app: kubernetes-dashboard
  name: kubernetes-dashboard
  namespace: kubernetes-dashboard
roleRef:
  apiGroup: rbac.authorization.k8s.io
  kind: Role
  name: kubernetes-dashboard
subjects:
  - kind: ServiceAccount
    name: kubernetes-dashboard
    namespace: kubernetes-dashboard

---

apiVersion: rbac.authorization.k8s.io/v1
kind: ClusterRoleBinding
metadata:
  name: kubernetes-dashboard
roleRef:
  apiGroup: rbac.authorization.k8s.io
  kind: ClusterRole
  name: kubernetes-dashboard
subjects:
  - kind: ServiceAccount
    name: kubernetes-dashboard
    namespace: kubernetes-dashboard

---

kind: Deployment
apiVersion: apps/v1
metadata:
  labels:
    k8s-app: kubernetes-dashboard
  name: kubernetes-dashboard
  namespace: kubernetes-dashboard
spec:
  replicas: 1
  revisionHistoryLimit: 10
  selector:
    matchLabels:
      k8s-app: kubernetes-dashboard
  template:
    metadata:
      labels:
        k8s-app: kubernetes-dashboard
    spec:
      containers:
        - name: kubernetes-dashboard
          image: kubernetesui/dashboard:v2.3.1
          imagePullPolicy: Always
          ports:
            - containerPort: 8443
              protocol: TCP
          args:
            - --auto-generate-certificates
            - --namespace=kubernetes-dashboard
            # Uncomment the following line to manually specify Kubernetes API server Host
            # If not specified, Dashboard will attempt to auto discover the API server and connect
            # to it. Uncomment only if the default does not work.
            # - --apiserver-host=http://my-address:port
          volumeMounts:
            - name: kubernetes-dashboard-certs
              mountPath: /certs
              # Create on-disk volume to store exec logs
            - mountPath: /tmp
              name: tmp-volume
          livenessProbe:
            httpGet:
              scheme: HTTPS
              path: /
              port: 8443
            initialDelaySeconds: 30
            timeoutSeconds: 30
          securityContext:
            allowPrivilegeEscalation: false
            readOnlyRootFilesystem: true
            runAsUser: 1001
            runAsGroup: 2001
      volumes:
        - name: kubernetes-dashboard-certs
          secret:
            secretName: kubernetes-dashboard-certs
        - name: tmp-volume
          emptyDir: {}
      serviceAccountName: kubernetes-dashboard
      nodeSelector:
        "kubernetes.io/os": linux
      # Comment the following tolerations if Dashboard must not be deployed on master
      tolerations:
        - key: node-role.kubernetes.io/master
          effect: NoSchedule

---

kind: Service
apiVersion: v1
metadata:
  labels:
    k8s-app: dashboard-metrics-scraper
  name: dashboard-metrics-scraper
  namespace: kubernetes-dashboard
spec:
  ports:
    - port: 8000
      targetPort: 8000
  selector:
    k8s-app: dashboard-metrics-scraper

---

kind: Deployment
apiVersion: apps/v1
metadata:
  labels:
    k8s-app: dashboard-metrics-scraper
  name: dashboard-metrics-scraper
  namespace: kubernetes-dashboard
spec:
  replicas: 1
  revisionHistoryLimit: 10
  selector:
    matchLabels:
      k8s-app: dashboard-metrics-scraper
  template:
    metadata:
      labels:
        k8s-app: dashboard-metrics-scraper
      annotations:
        seccomp.security.alpha.kubernetes.io/pod: 'runtime/default'
    spec:
      containers:
        - name: dashboard-metrics-scraper
          image: kubernetesui/metrics-scraper:v1.0.6
          ports:
            - containerPort: 8000
              protocol: TCP
          livenessProbe:
            httpGet:
              scheme: HTTP
              path: /
              port: 8000
            initialDelaySeconds: 30
            timeoutSeconds: 30
          volumeMounts:
          - mountPath: /tmp
            name: tmp-volume
          securityContext:
            allowPrivilegeEscalation: false
            readOnlyRootFilesystem: true
            runAsUser: 1001
            runAsGroup: 2001
      serviceAccountName: kubernetes-dashboard
      nodeSelector:
        "kubernetes.io/os": linux
      # Comment the following tolerations if Dashboard must not be deployed on master
      tolerations:
        - key: node-role.kubernetes.io/master
          effect: NoSchedule
      volumes:
        - name: tmp-volume
          emptyDir: {}
kube-flannel.yml
---
apiVersion: policy/v1beta1
kind: PodSecurityPolicy
metadata:
  name: psp.flannel.unprivileged
  annotations:
    seccomp.security.alpha.kubernetes.io/allowedProfileNames: docker/default
    seccomp.security.alpha.kubernetes.io/defaultProfileName: docker/default
    apparmor.security.beta.kubernetes.io/allowedProfileNames: runtime/default
    apparmor.security.beta.kubernetes.io/defaultProfileName: runtime/default
spec:
  privileged: false
  volumes:
    - configMap
    - secret
    - emptyDir
    - hostPath
  allowedHostPaths:
    - pathPrefix: "/etc/cni/net.d"
    - pathPrefix: "/etc/kube-flannel"
    - pathPrefix: "/run/flannel"
  readOnlyRootFilesystem: false
  # Users and groups
  runAsUser:
    rule: RunAsAny
  supplementalGroups:
    rule: RunAsAny
  fsGroup:
    rule: RunAsAny
  # Privilege Escalation
  allowPrivilegeEscalation: false
  defaultAllowPrivilegeEscalation: false
  # Capabilities
  allowedCapabilities: ['NET_ADMIN']
  defaultAddCapabilities: []
  requiredDropCapabilities: []
  # Host namespaces
  hostPID: false
  hostIPC: false
  hostNetwork: true
  hostPorts:
  - min: 0
    max: 65535
  # SELinux
  seLinux:
    # SELinux is unsed in CaaSP
    rule: 'RunAsAny'
---
kind: ClusterRole
apiVersion: rbac.authorization.k8s.io/v1beta1
metadata:
  name: flannel
rules:
  - apiGroups: ['extensions']
    resources: ['podsecuritypolicies']
    verbs: ['use']
    resourceNames: ['psp.flannel.unprivileged']
  - apiGroups:
      - ""
    resources:
      - pods
    verbs:
      - get
  - apiGroups:
      - ""
    resources:
      - nodes
    verbs:
      - list
      - watch
  - apiGroups:
      - ""
    resources:
      - nodes/status
    verbs:
      - patch
---
kind: ClusterRoleBinding
apiVersion: rbac.authorization.k8s.io/v1beta1
metadata:
  name: flannel
roleRef:
  apiGroup: rbac.authorization.k8s.io
  kind: ClusterRole
  name: flannel
subjects:
- kind: ServiceAccount
  name: flannel
  namespace: kube-system
---
apiVersion: v1
kind: ServiceAccount
metadata:
  name: flannel
  namespace: kube-system
---
kind: ConfigMap
apiVersion: v1
metadata:
  name: kube-flannel-cfg
  namespace: kube-system
  labels:
    tier: node
    app: flannel
data:
  cni-conf.json: |
    {
      "cniVersion": "0.2.0",
      "name": "cbr0",
      "plugins": [
        {
          "type": "flannel",
          "delegate": {
            "hairpinMode": true,
            "isDefaultGateway": true
          }
        },
        {
          "type": "portmap",
          "capabilities": {
            "portMappings": true
          }
        }
      ]
    }
  net-conf.json: |
    {
      "Network": "10.244.0.0/16",
      "Backend": {
        "Type": "vxlan"
      }
    }
---
apiVersion: apps/v1
kind: DaemonSet
metadata:
  name: kube-flannel-ds-amd64
  namespace: kube-system
  labels:
    tier: node
    app: flannel
spec:
  selector:
    matchLabels:
      app: flannel
  template:
    metadata:
      labels:
        tier: node
        app: flannel
    spec:
      affinity:
        nodeAffinity:
          requiredDuringSchedulingIgnoredDuringExecution:
            nodeSelectorTerms:
              - matchExpressions:
                  - key: beta.kubernetes.io/os
                    operator: In
                    values:
                      - linux
                  - key: beta.kubernetes.io/arch
                    operator: In
                    values:
                      - amd64
      hostNetwork: true
      tolerations:
      - operator: Exists
        effect: NoSchedule
      serviceAccountName: flannel
      initContainers:
      - name: install-cni
        image: quay.io/coreos/flannel:v0.11.0-amd64
        command:
        - cp
        args:
        - -f
        - /etc/kube-flannel/cni-conf.json
        - /etc/cni/net.d/10-flannel.conflist
        volumeMounts:
        - name: cni
          mountPath: /etc/cni/net.d
        - name: flannel-cfg
          mountPath: /etc/kube-flannel/
      containers:
      - name: kube-flannel
        image: quay.io/coreos/flannel:v0.11.0-amd64
        command:
        - /opt/bin/flanneld
        args:
        - --ip-masq
        - --kube-subnet-mgr
        resources:
          requests:
            cpu: "100m"
            memory: "50Mi"
          limits:
            cpu: "100m"
            memory: "50Mi"
        securityContext:
          privileged: false
          capabilities:
             add: ["NET_ADMIN"]
        env:
        - name: POD_NAME
          valueFrom:
            fieldRef:
              fieldPath: metadata.name
        - name: POD_NAMESPACE
          valueFrom:
            fieldRef:
              fieldPath: metadata.namespace
        volumeMounts:
        - name: run
          mountPath: /run/flannel
        - name: flannel-cfg
          mountPath: /etc/kube-flannel/
      volumes:
        - name: run
          hostPath:
            path: /run/flannel
        - name: cni
          hostPath:
            path: /etc/cni/net.d
        - name: flannel-cfg
          configMap:
            name: kube-flannel-cfg
---
apiVersion: apps/v1
kind: DaemonSet
metadata:
  name: kube-flannel-ds-arm64
  namespace: kube-system
  labels:
    tier: node
    app: flannel
spec:
  selector:
    matchLabels:
      app: flannel
  template:
    metadata:
      labels:
        tier: node
        app: flannel
    spec:
      affinity:
        nodeAffinity:
          requiredDuringSchedulingIgnoredDuringExecution:
            nodeSelectorTerms:
              - matchExpressions:
                  - key: beta.kubernetes.io/os
                    operator: In
                    values:
                      - linux
                  - key: beta.kubernetes.io/arch
                    operator: In
                    values:
                      - arm64
      hostNetwork: true
      tolerations:
      - operator: Exists
        effect: NoSchedule
      serviceAccountName: flannel
      initContainers:
      - name: install-cni
        image: quay.io/coreos/flannel:v0.11.0-arm64
        command:
        - cp
        args:
        - -f
        - /etc/kube-flannel/cni-conf.json
        - /etc/cni/net.d/10-flannel.conflist
        volumeMounts:
        - name: cni
          mountPath: /etc/cni/net.d
        - name: flannel-cfg
          mountPath: /etc/kube-flannel/
      containers:
      - name: kube-flannel
        image: quay.io/coreos/flannel:v0.11.0-arm64
        command:
        - /opt/bin/flanneld
        args:
        - --ip-masq
        - --kube-subnet-mgr
        resources:
          requests:
            cpu: "100m"
            memory: "50Mi"
          limits:
            cpu: "100m"
            memory: "50Mi"
        securityContext:
          privileged: false
          capabilities:
             add: ["NET_ADMIN"]
        env:
        - name: POD_NAME
          valueFrom:
            fieldRef:
              fieldPath: metadata.name
        - name: POD_NAMESPACE
          valueFrom:
            fieldRef:
              fieldPath: metadata.namespace
        volumeMounts:
        - name: run
          mountPath: /run/flannel
        - name: flannel-cfg
          mountPath: /etc/kube-flannel/
      volumes:
        - name: run
          hostPath:
            path: /run/flannel
        - name: cni
          hostPath:
            path: /etc/cni/net.d
        - name: flannel-cfg
          configMap:
            name: kube-flannel-cfg
---
apiVersion: apps/v1
kind: DaemonSet
metadata:
  name: kube-flannel-ds-arm
  namespace: kube-system
  labels:
    tier: node
    app: flannel
spec:
  selector:
    matchLabels:
      app: flannel
  template:
    metadata:
      labels:
        tier: node
        app: flannel
    spec:
      affinity:
        nodeAffinity:
          requiredDuringSchedulingIgnoredDuringExecution:
            nodeSelectorTerms:
              - matchExpressions:
                  - key: beta.kubernetes.io/os
                    operator: In
                    values:
                      - linux
                  - key: beta.kubernetes.io/arch
                    operator: In
                    values:
                      - arm
      hostNetwork: true
      tolerations:
      - operator: Exists
        effect: NoSchedule
      serviceAccountName: flannel
      initContainers:
      - name: install-cni
        image: quay.io/coreos/flannel:v0.11.0-arm
        command:
        - cp
        args:
        - -f
        - /etc/kube-flannel/cni-conf.json
        - /etc/cni/net.d/10-flannel.conflist
        volumeMounts:
        - name: cni
          mountPath: /etc/cni/net.d
        - name: flannel-cfg
          mountPath: /etc/kube-flannel/
      containers:
      - name: kube-flannel
        image: quay.io/coreos/flannel:v0.11.0-arm
        command:
        - /opt/bin/flanneld
        args:
        - --ip-masq
        - --kube-subnet-mgr
        resources:
          requests:
            cpu: "100m"
            memory: "50Mi"
          limits:
            cpu: "100m"
            memory: "50Mi"
        securityContext:
          privileged: false
          capabilities:
             add: ["NET_ADMIN"]
        env:
        - name: POD_NAME
          valueFrom:
            fieldRef:
              fieldPath: metadata.name
        - name: POD_NAMESPACE
          valueFrom:
            fieldRef:
              fieldPath: metadata.namespace
        volumeMounts:
        - name: run
          mountPath: /run/flannel
        - name: flannel-cfg
          mountPath: /etc/kube-flannel/
      volumes:
        - name: run
          hostPath:
            path: /run/flannel
        - name: cni
          hostPath:
            path: /etc/cni/net.d
        - name: flannel-cfg
          configMap:
            name: kube-flannel-cfg
---
apiVersion: apps/v1
kind: DaemonSet
metadata:
  name: kube-flannel-ds-ppc64le
  namespace: kube-system
  labels:
    tier: node
    app: flannel
spec:
  selector:
    matchLabels:
      app: flannel
  template:
    metadata:
      labels:
        tier: node
        app: flannel
    spec:
      affinity:
        nodeAffinity:
          requiredDuringSchedulingIgnoredDuringExecution:
            nodeSelectorTerms:
              - matchExpressions:
                  - key: beta.kubernetes.io/os
                    operator: In
                    values:
                      - linux
                  - key: beta.kubernetes.io/arch
                    operator: In
                    values:
                      - ppc64le
      hostNetwork: true
      tolerations:
      - operator: Exists
        effect: NoSchedule
      serviceAccountName: flannel
      initContainers:
      - name: install-cni
        image: quay.io/coreos/flannel:v0.11.0-ppc64le
        command:
        - cp
        args:
        - -f
        - /etc/kube-flannel/cni-conf.json
        - /etc/cni/net.d/10-flannel.conflist
        volumeMounts:
        - name: cni
          mountPath: /etc/cni/net.d
        - name: flannel-cfg
          mountPath: /etc/kube-flannel/
      containers:
      - name: kube-flannel
        image: quay.io/coreos/flannel:v0.11.0-ppc64le
        command:
        - /opt/bin/flanneld
        args:
        - --ip-masq
        - --kube-subnet-mgr
        resources:
          requests:
            cpu: "100m"
            memory: "50Mi"
          limits:
            cpu: "100m"
            memory: "50Mi"
        securityContext:
          privileged: false
          capabilities:
             add: ["NET_ADMIN"]
        env:
        - name: POD_NAME
          valueFrom:
            fieldRef:
              fieldPath: metadata.name
        - name: POD_NAMESPACE
          valueFrom:
            fieldRef:
              fieldPath: metadata.namespace
        volumeMounts:
        - name: run
          mountPath: /run/flannel
        - name: flannel-cfg
          mountPath: /etc/kube-flannel/
      volumes:
        - name: run
          hostPath:
            path: /run/flannel
        - name: cni
          hostPath:
            path: /etc/cni/net.d
        - name: flannel-cfg
          configMap:
            name: kube-flannel-cfg
---
apiVersion: apps/v1
kind: DaemonSet
metadata:
  name: kube-flannel-ds-s390x
  namespace: kube-system
  labels:
    tier: node
    app: flannel
spec:
  selector:
    matchLabels:
      app: flannel
  template:
    metadata:
      labels:
        tier: node
        app: flannel
    spec:
      affinity:
        nodeAffinity:
          requiredDuringSchedulingIgnoredDuringExecution:
            nodeSelectorTerms:
              - matchExpressions:
                  - key: beta.kubernetes.io/os
                    operator: In
                    values:
                      - linux
                  - key: beta.kubernetes.io/arch
                    operator: In
                    values:
                      - s390x
      hostNetwork: true
      tolerations:
      - operator: Exists
        effect: NoSchedule
      serviceAccountName: flannel
      initContainers:
      - name: install-cni
        image: quay.io/coreos/flannel:v0.11.0-s390x
        command:
        - cp
        args:
        - -f
        - /etc/kube-flannel/cni-conf.json
        - /etc/cni/net.d/10-flannel.conflist
        volumeMounts:
        - name: cni
          mountPath: /etc/cni/net.d
        - name: flannel-cfg
          mountPath: /etc/kube-flannel/
      containers:
      - name: kube-flannel
        image: quay.io/coreos/flannel:v0.11.0-s390x
        command:
        - /opt/bin/flanneld
        args:
        - --ip-masq
        - --kube-subnet-mgr
        resources:
          requests:
            cpu: "100m"
            memory: "50Mi"
          limits:
            cpu: "100m"
            memory: "50Mi"
        securityContext:
          privileged: false
          capabilities:
             add: ["NET_ADMIN"]
        env:
        - name: POD_NAME
          valueFrom:
            fieldRef:
              fieldPath: metadata.name
        - name: POD_NAMESPACE
          valueFrom:
            fieldRef:
              fieldPath: metadata.namespace
        volumeMounts:
        - name: run
          mountPath: /run/flannel
        - name: flannel-cfg
          mountPath: /etc/kube-flannel/
      volumes:
        - name: run
          hostPath:
            path: /run/flannel
        - name: cni
          hostPath:
            path: /etc/cni/net.d
        - name: flannel-cfg
          configMap:
            name: kube-flannel-cfg
参考文档
Centos7.6部署k8s v1.16.4高可用集群(主备模式)	 https://www.kubernetes.org.cn/6632.html
k8s高可用部署:keepalived + haproxy		    https://www.kubernetes.org.cn/6964.html
Centos7.8安装K8s 1.21.x 最新高可用集群		  https://blog.51cto.com/8999a/2784601
部署高可用kubernetes集群					   https://github.com/sskcal/kubernetes
阳明的博客(k8s-book)							https://www.qikqiak.com/k8s-book/
k8s中文文档									 https://kubernetes.io/zh/docs/home/
安装网络驱动		https://kubernetes.io/zh/docs/tasks/administer-cluster/network-policy-provider/_print/
calico官方文档	 https://docs.projectcalico.org/getting-started/kubernetes/self-managed-onprem/onpremises
web_ui		    https://kubernetes.io/zh/docs/tasks/access-application-cluster/web-ui-dashboard/
帮助
kubeadm reset 尽最大努力还原通过 'kubeadm init' 或者 'kubeadm join' 操作对主机所做的更改